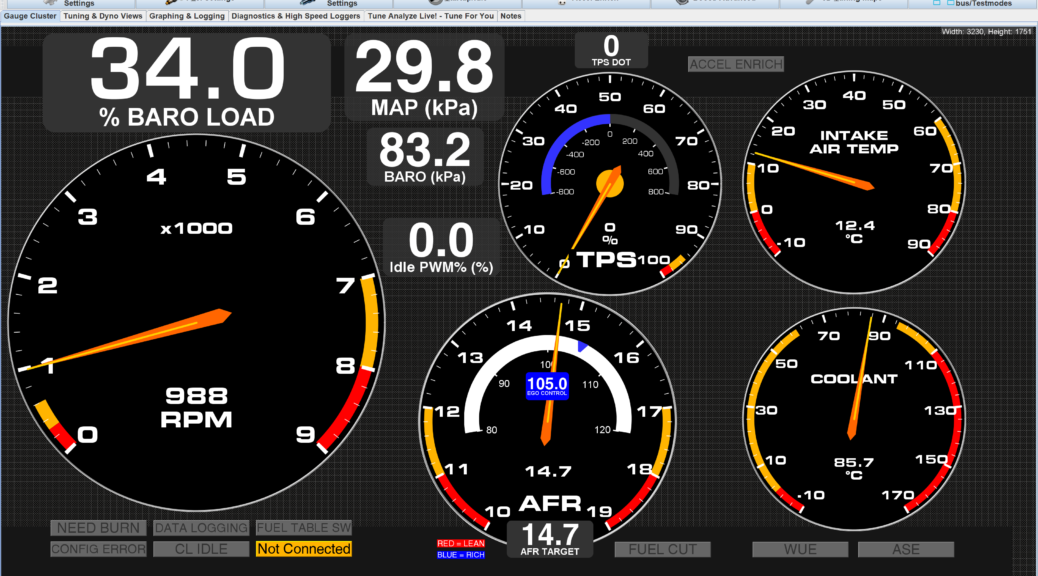
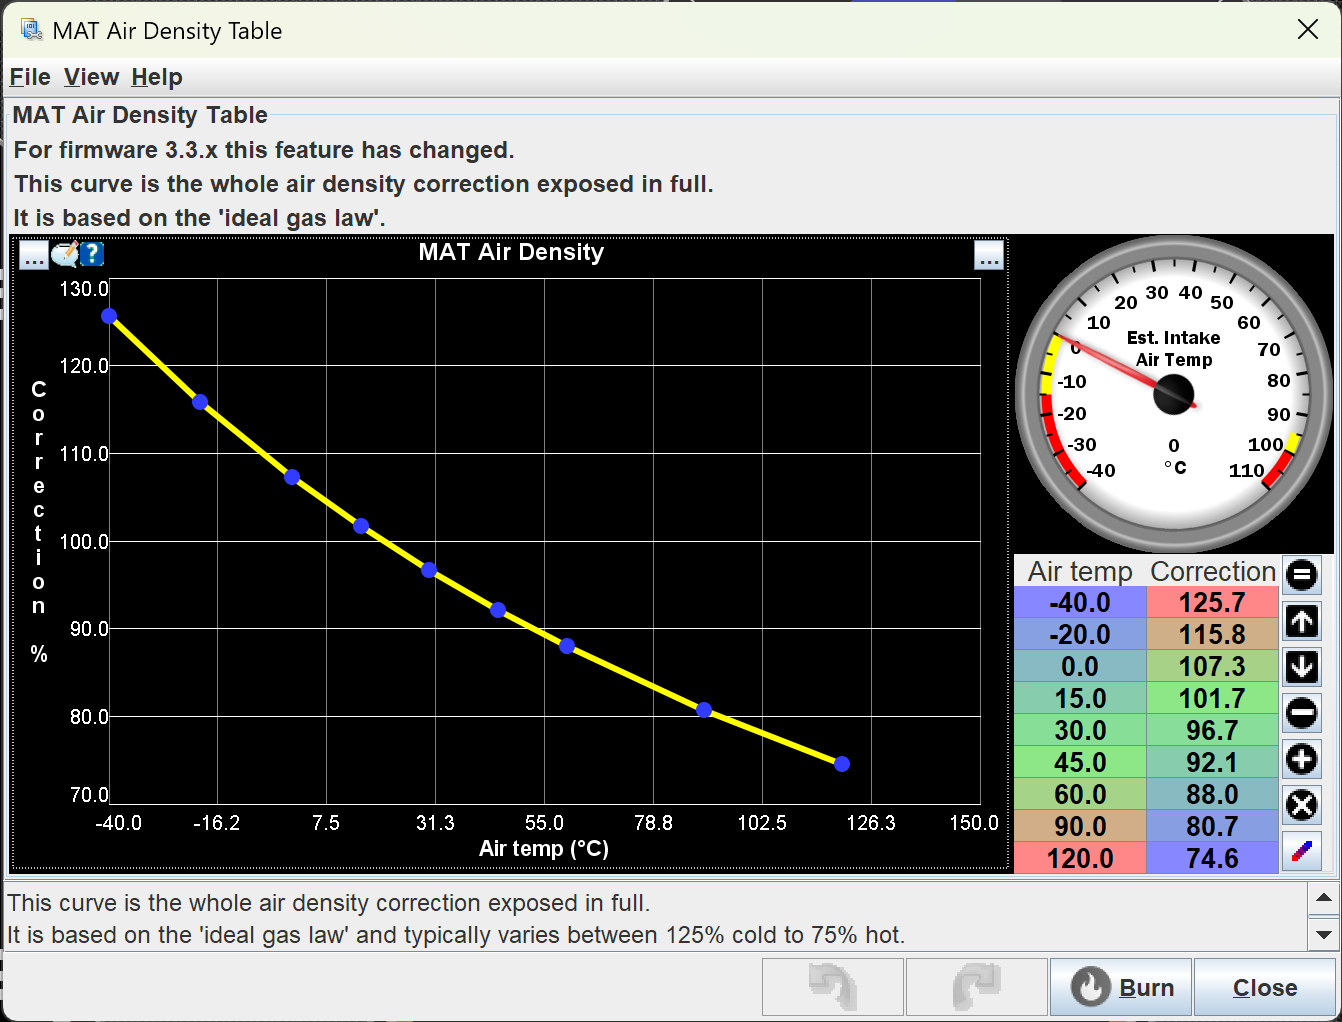
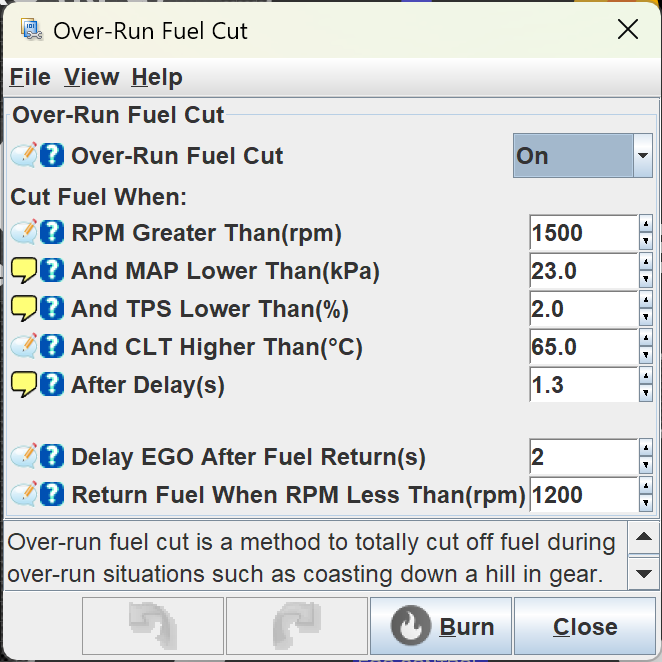
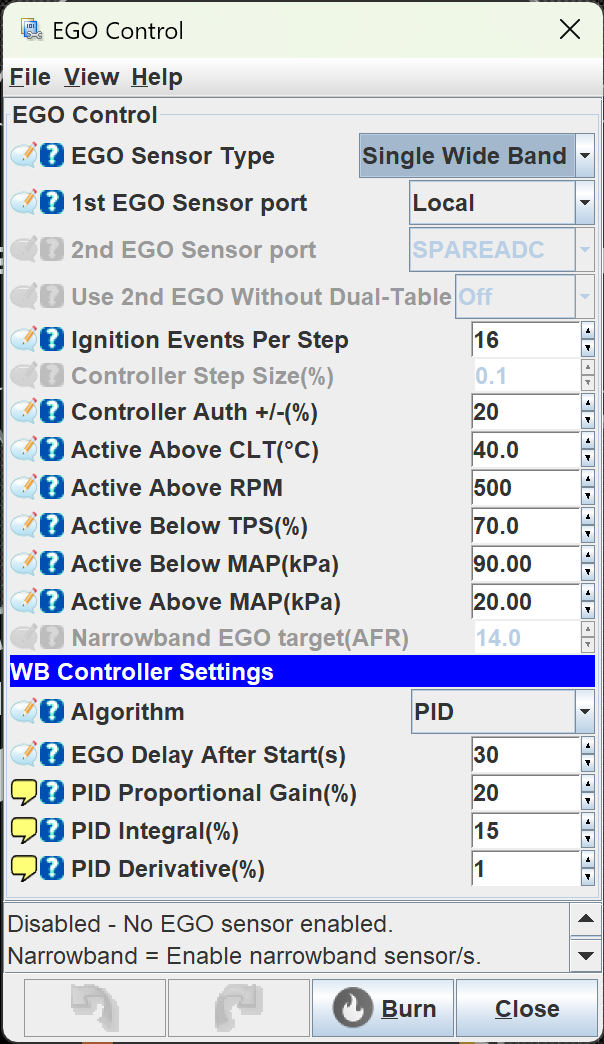
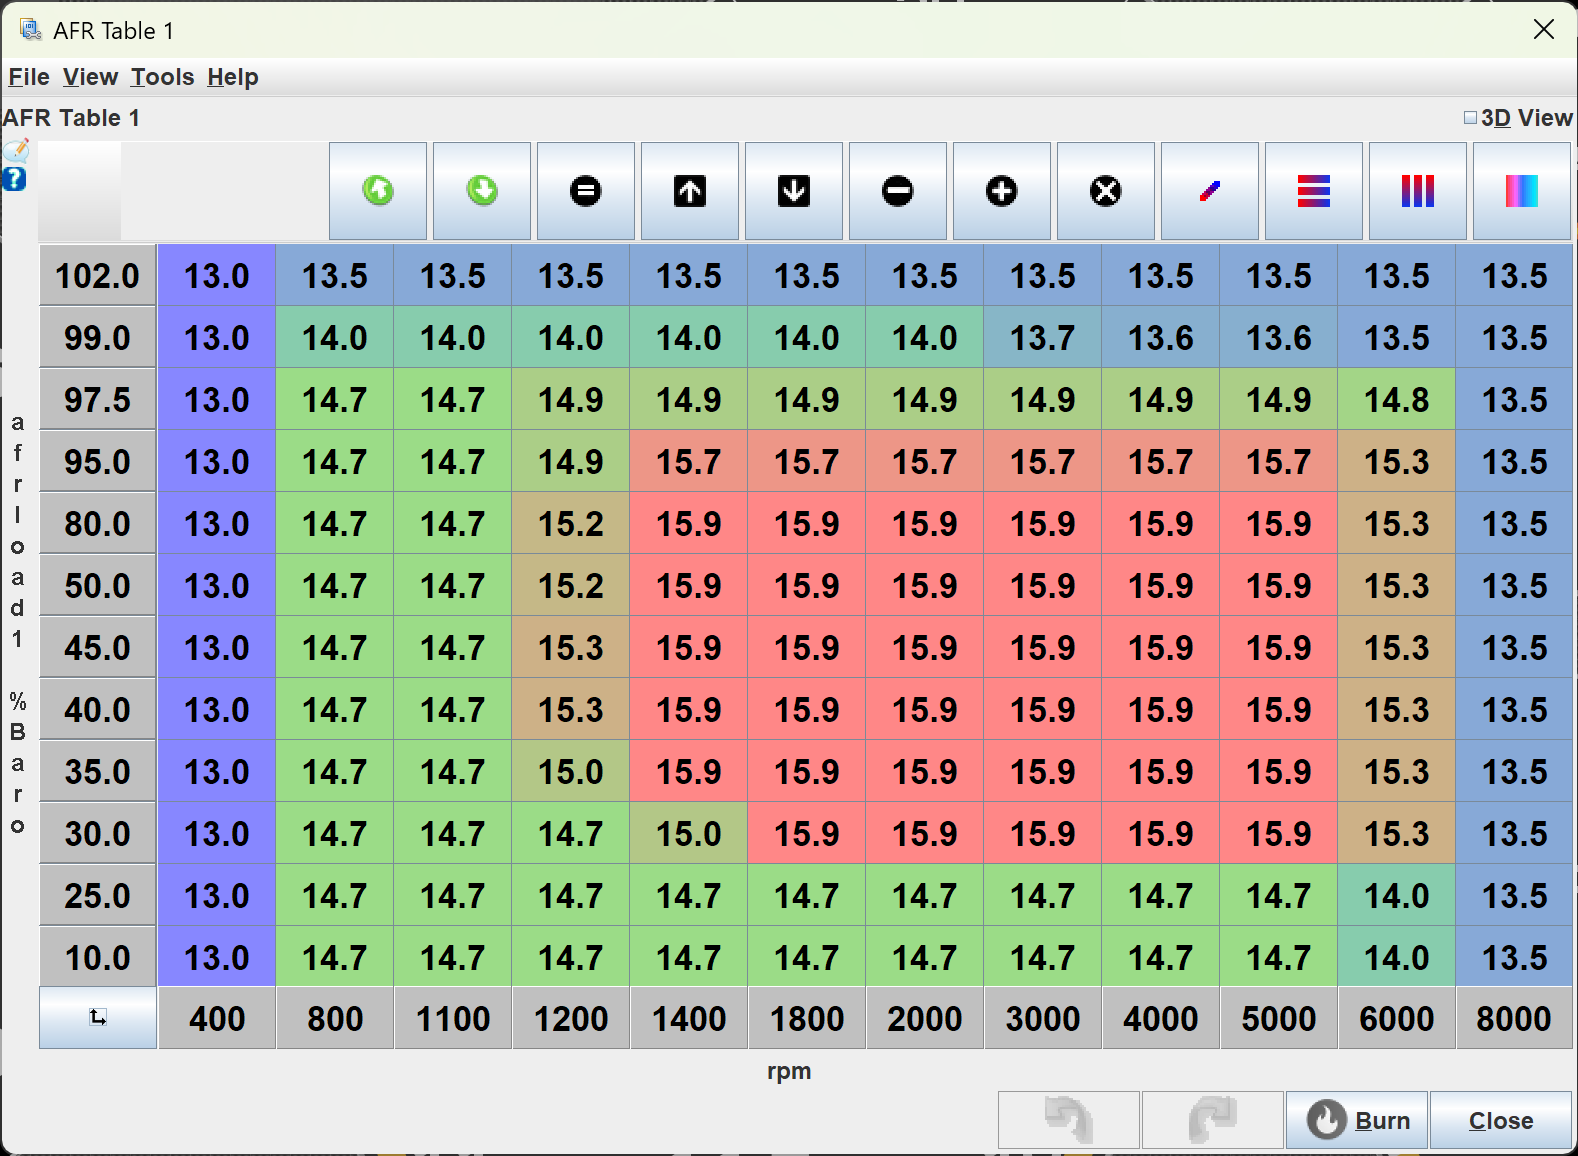
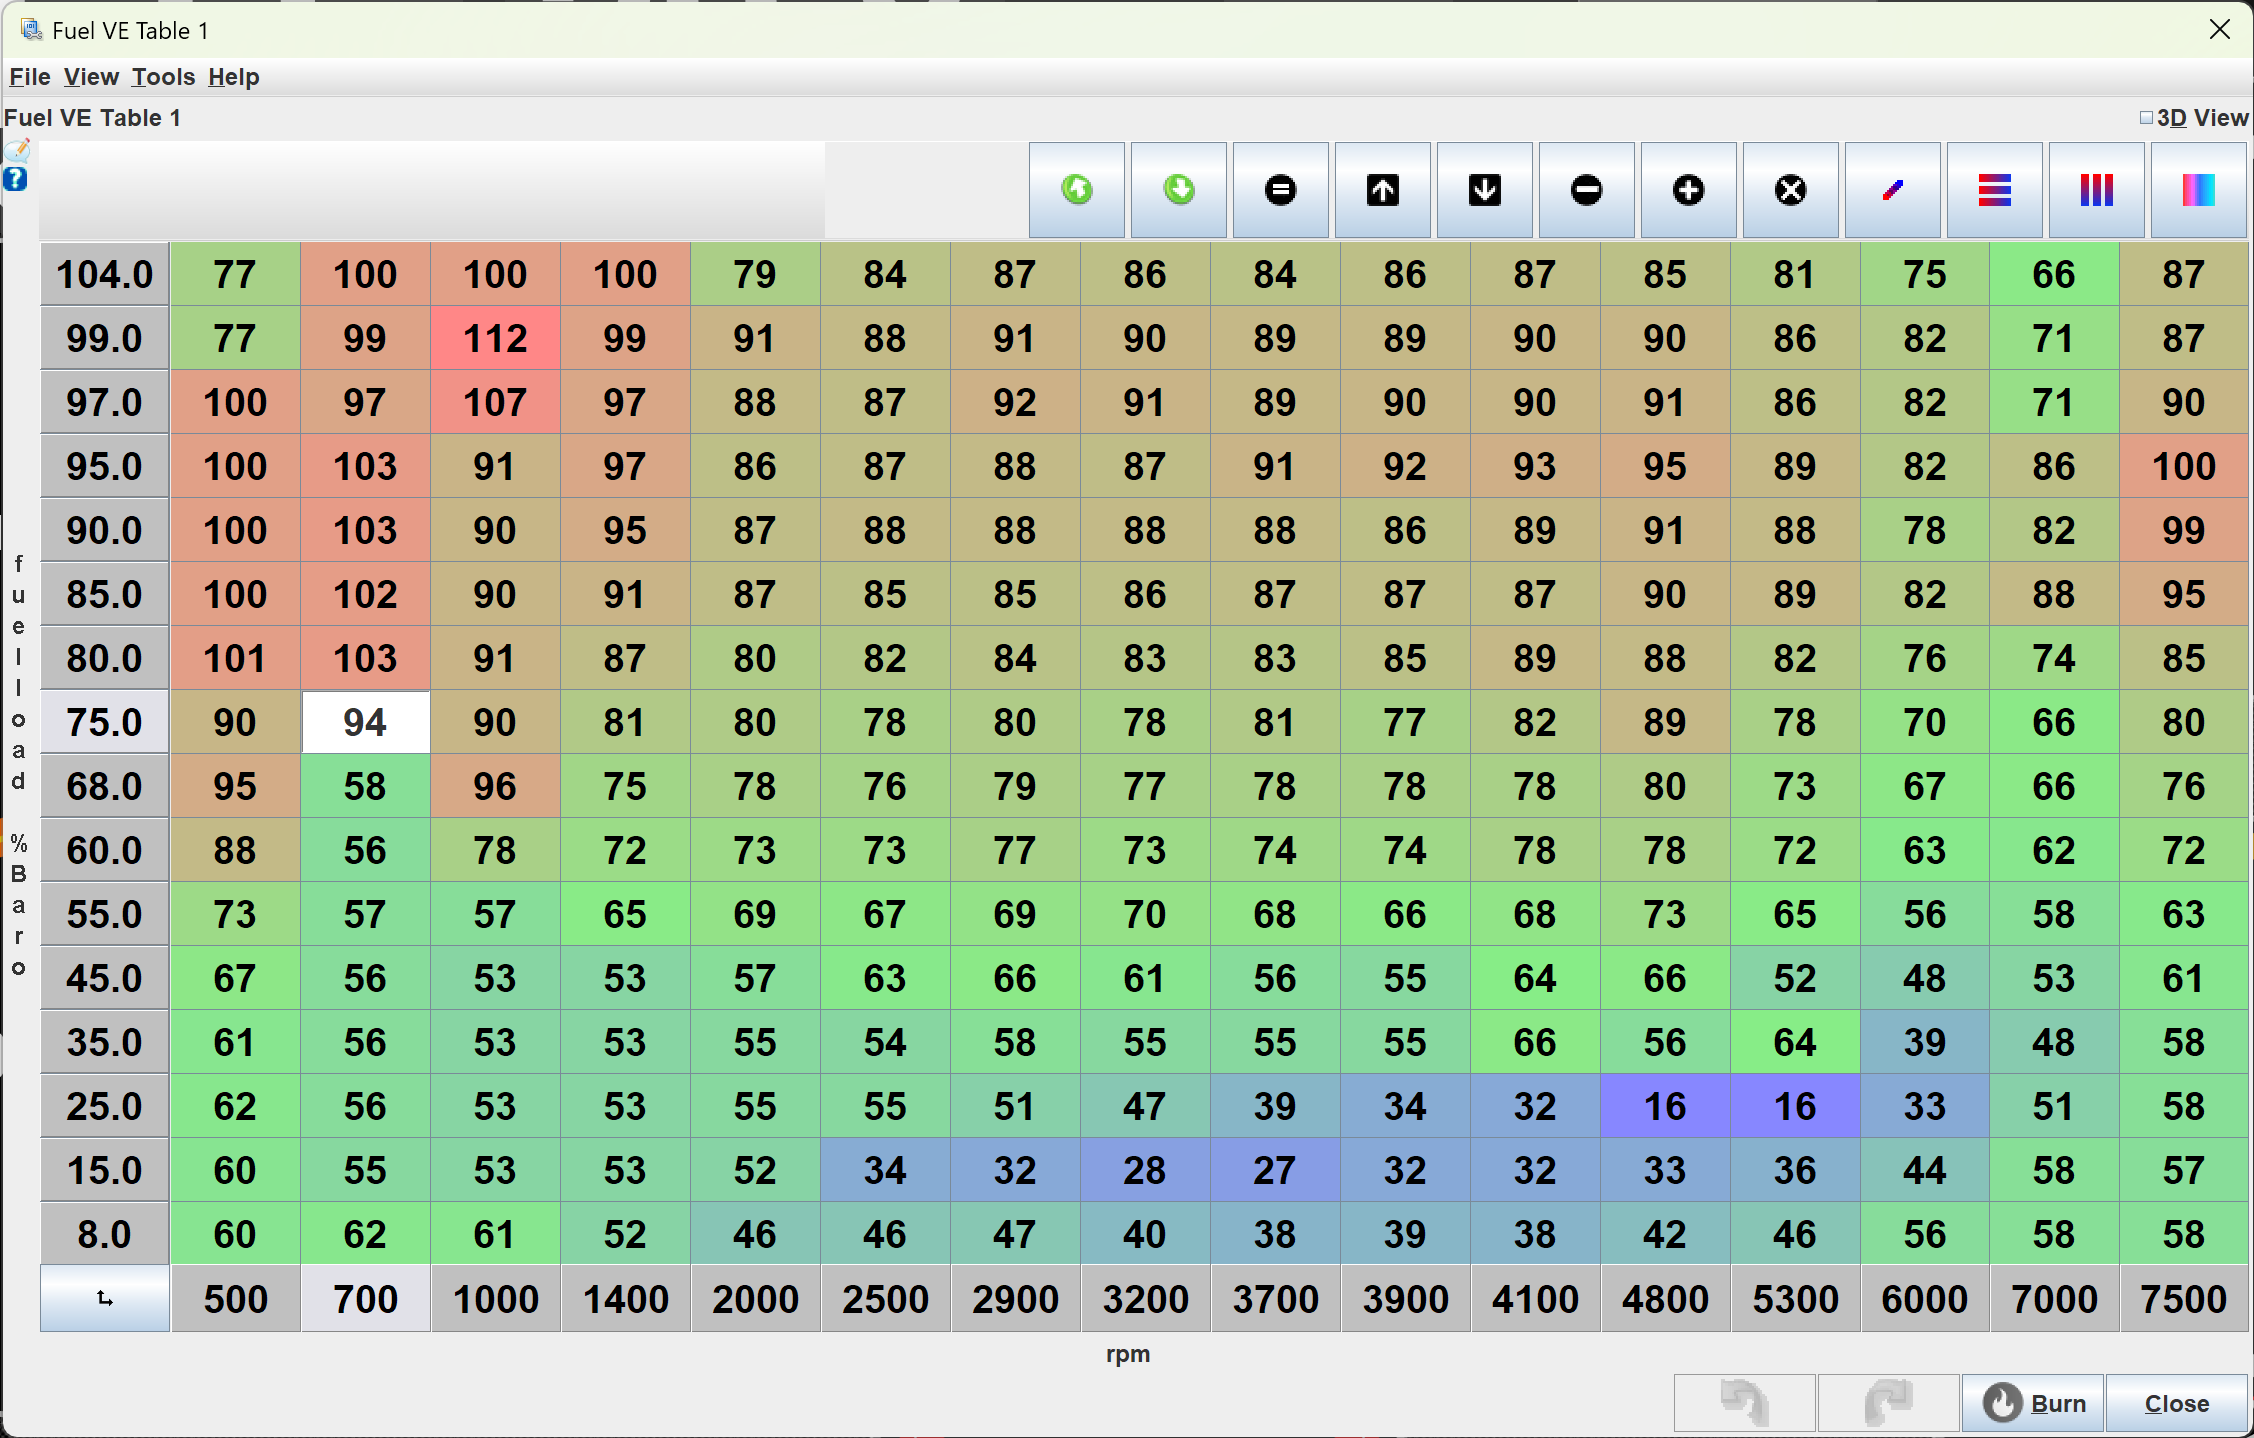
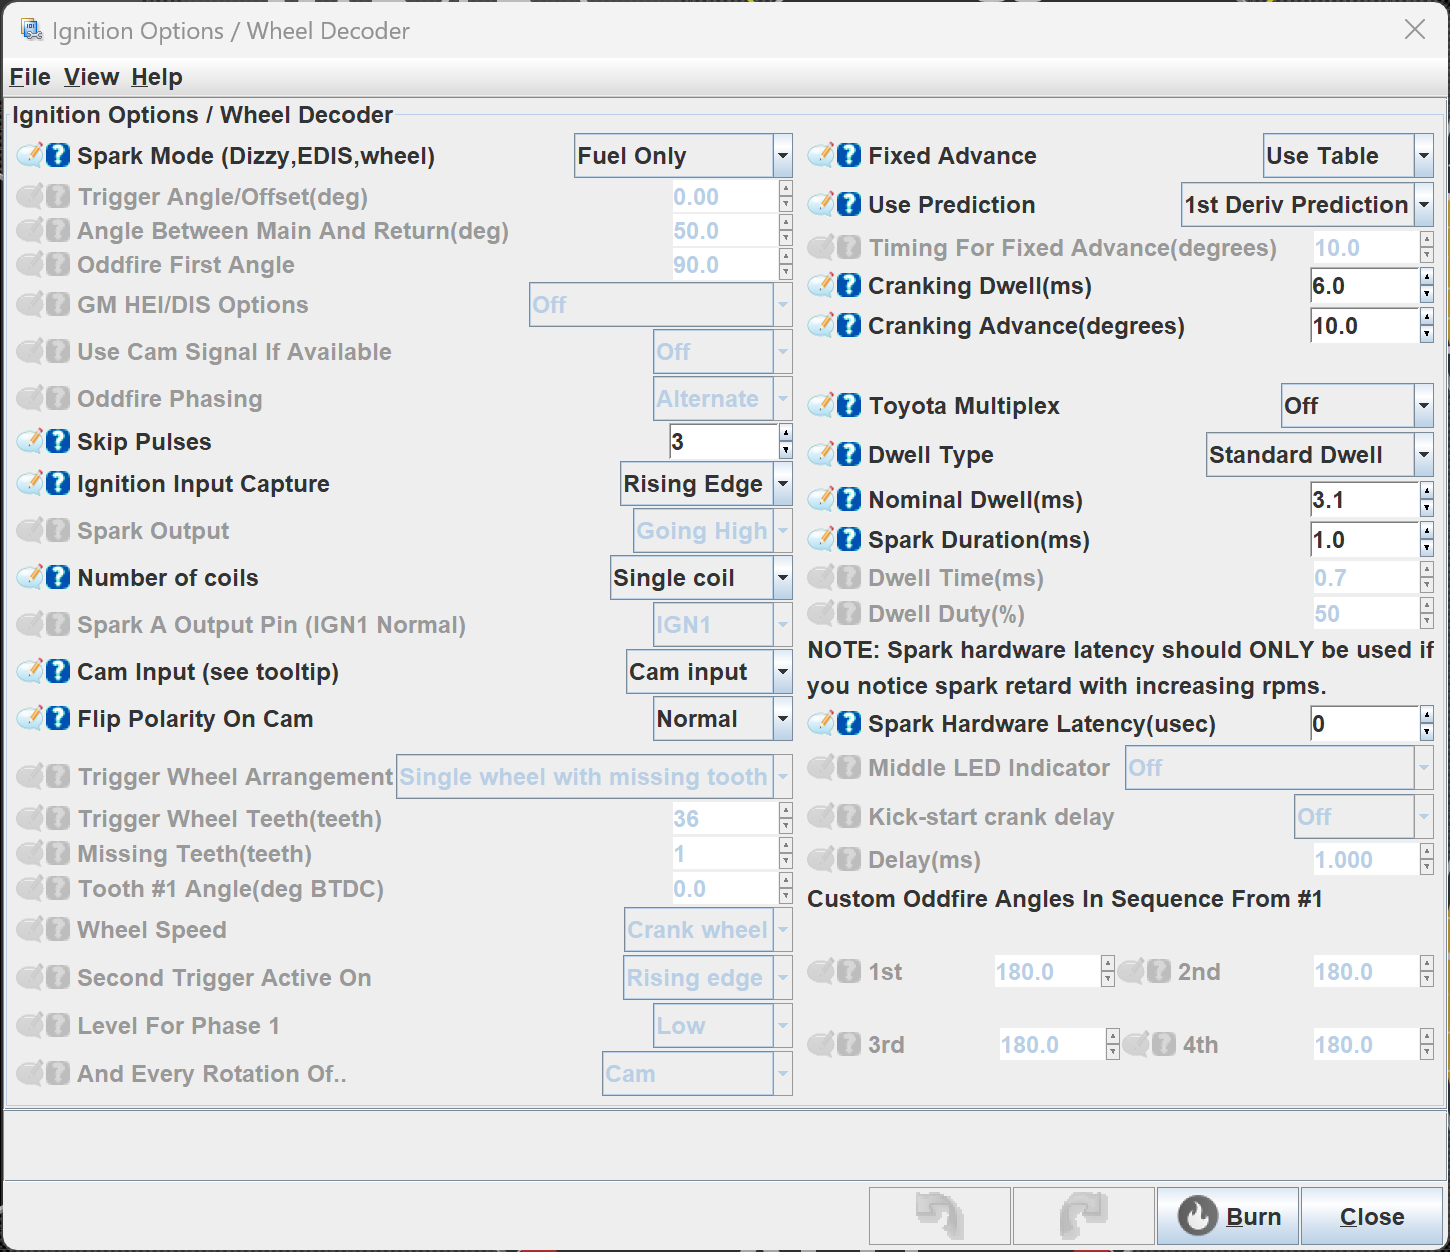
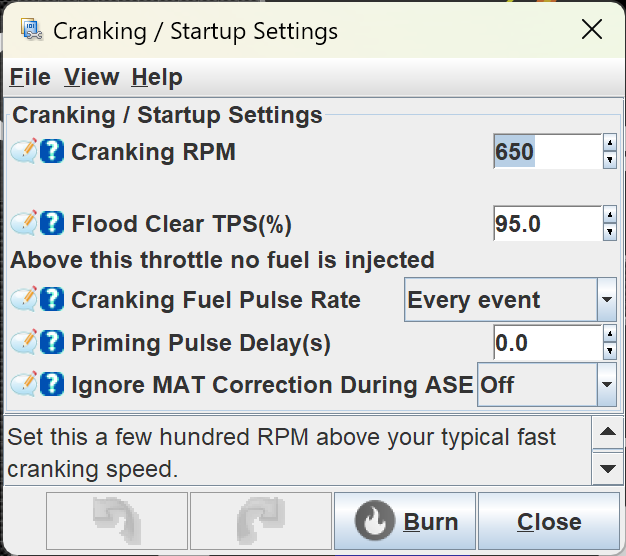
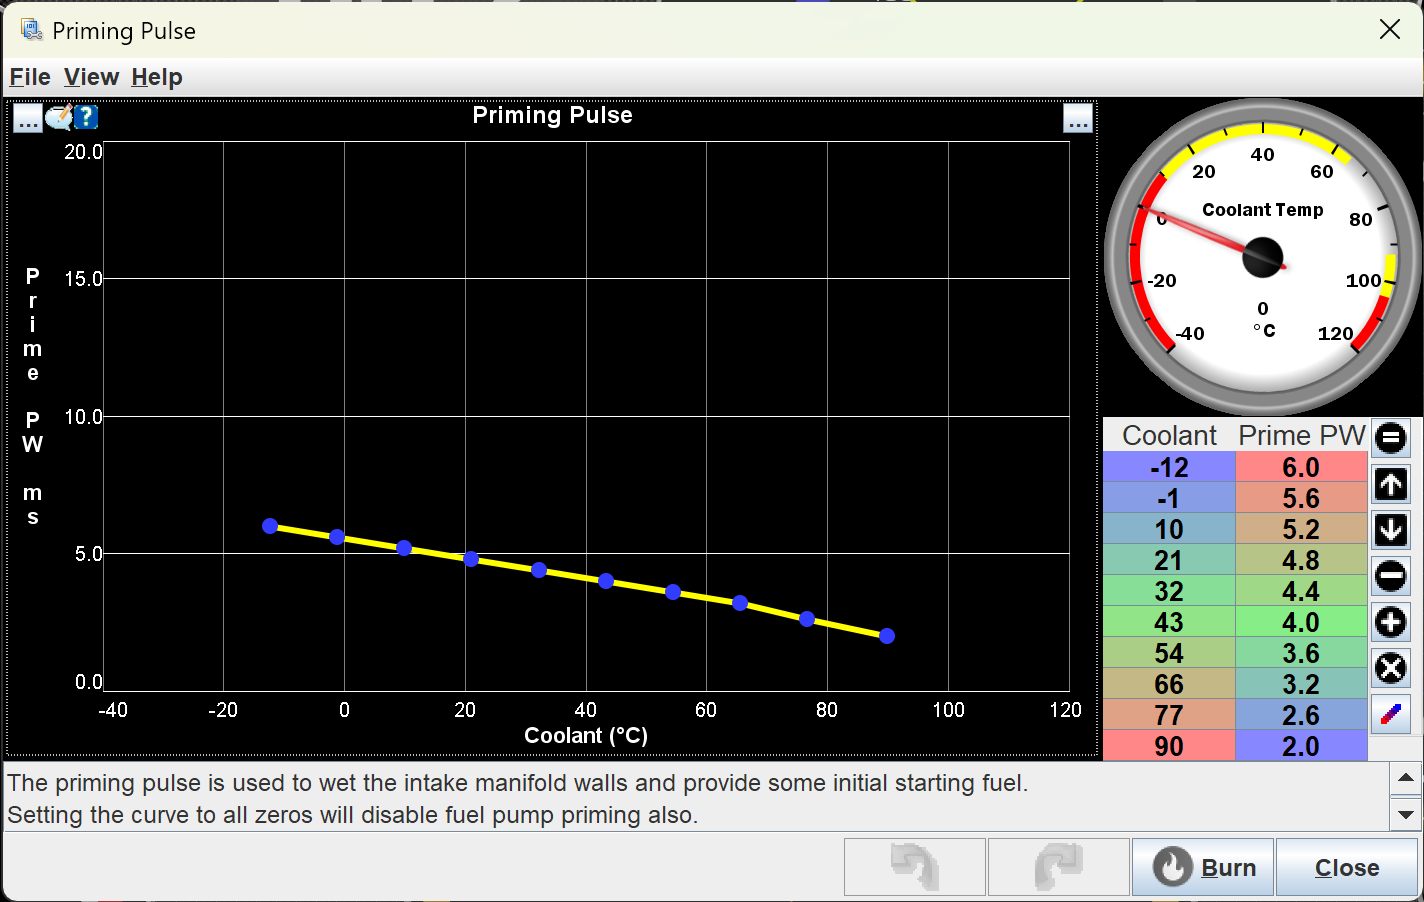
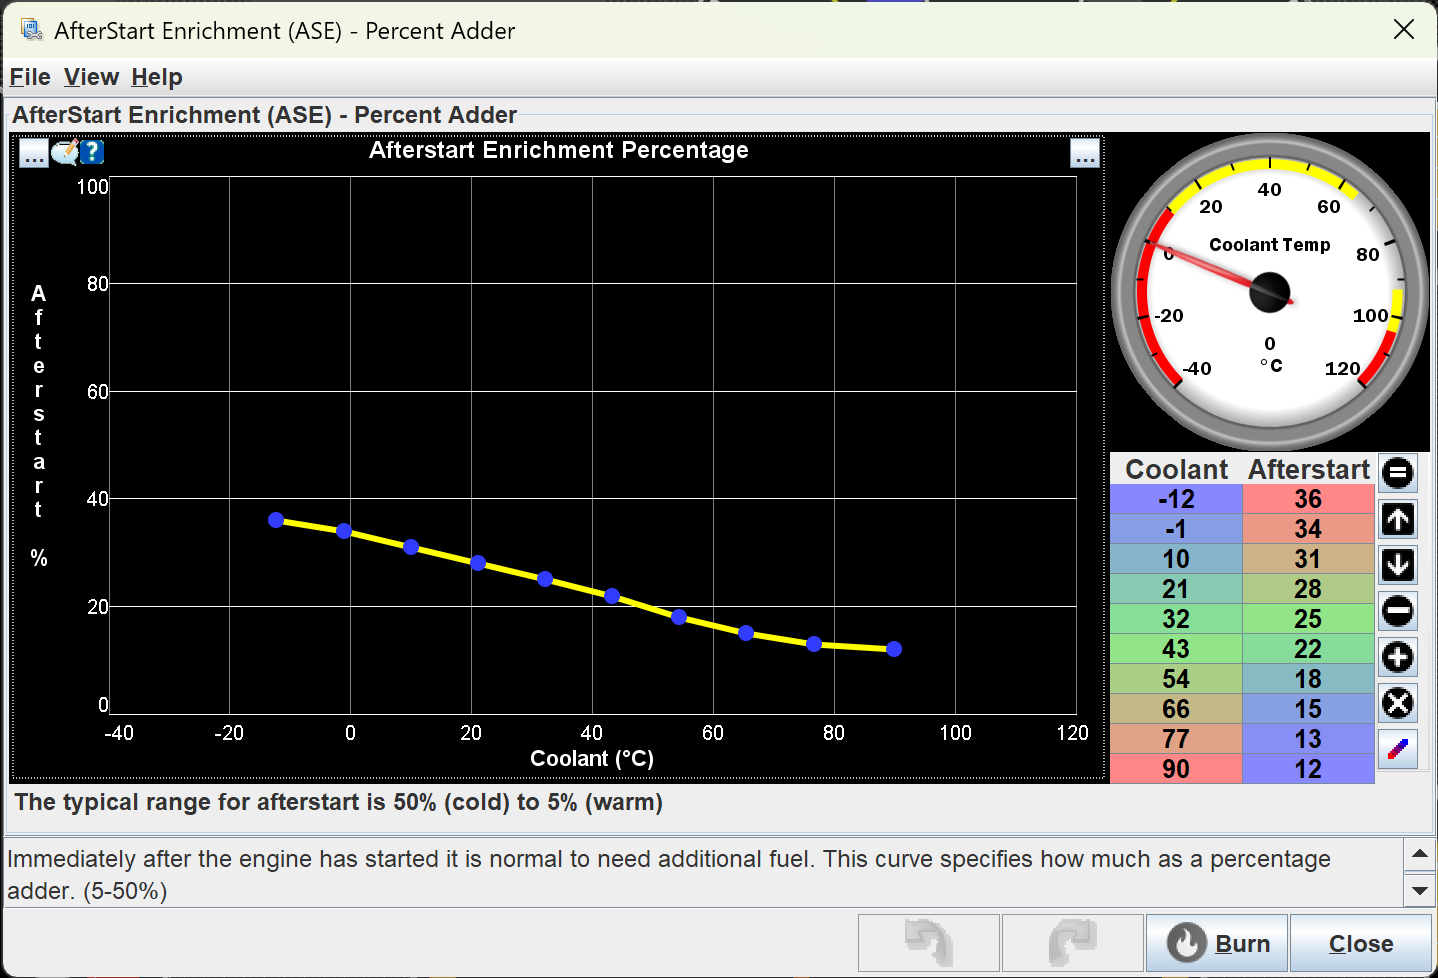
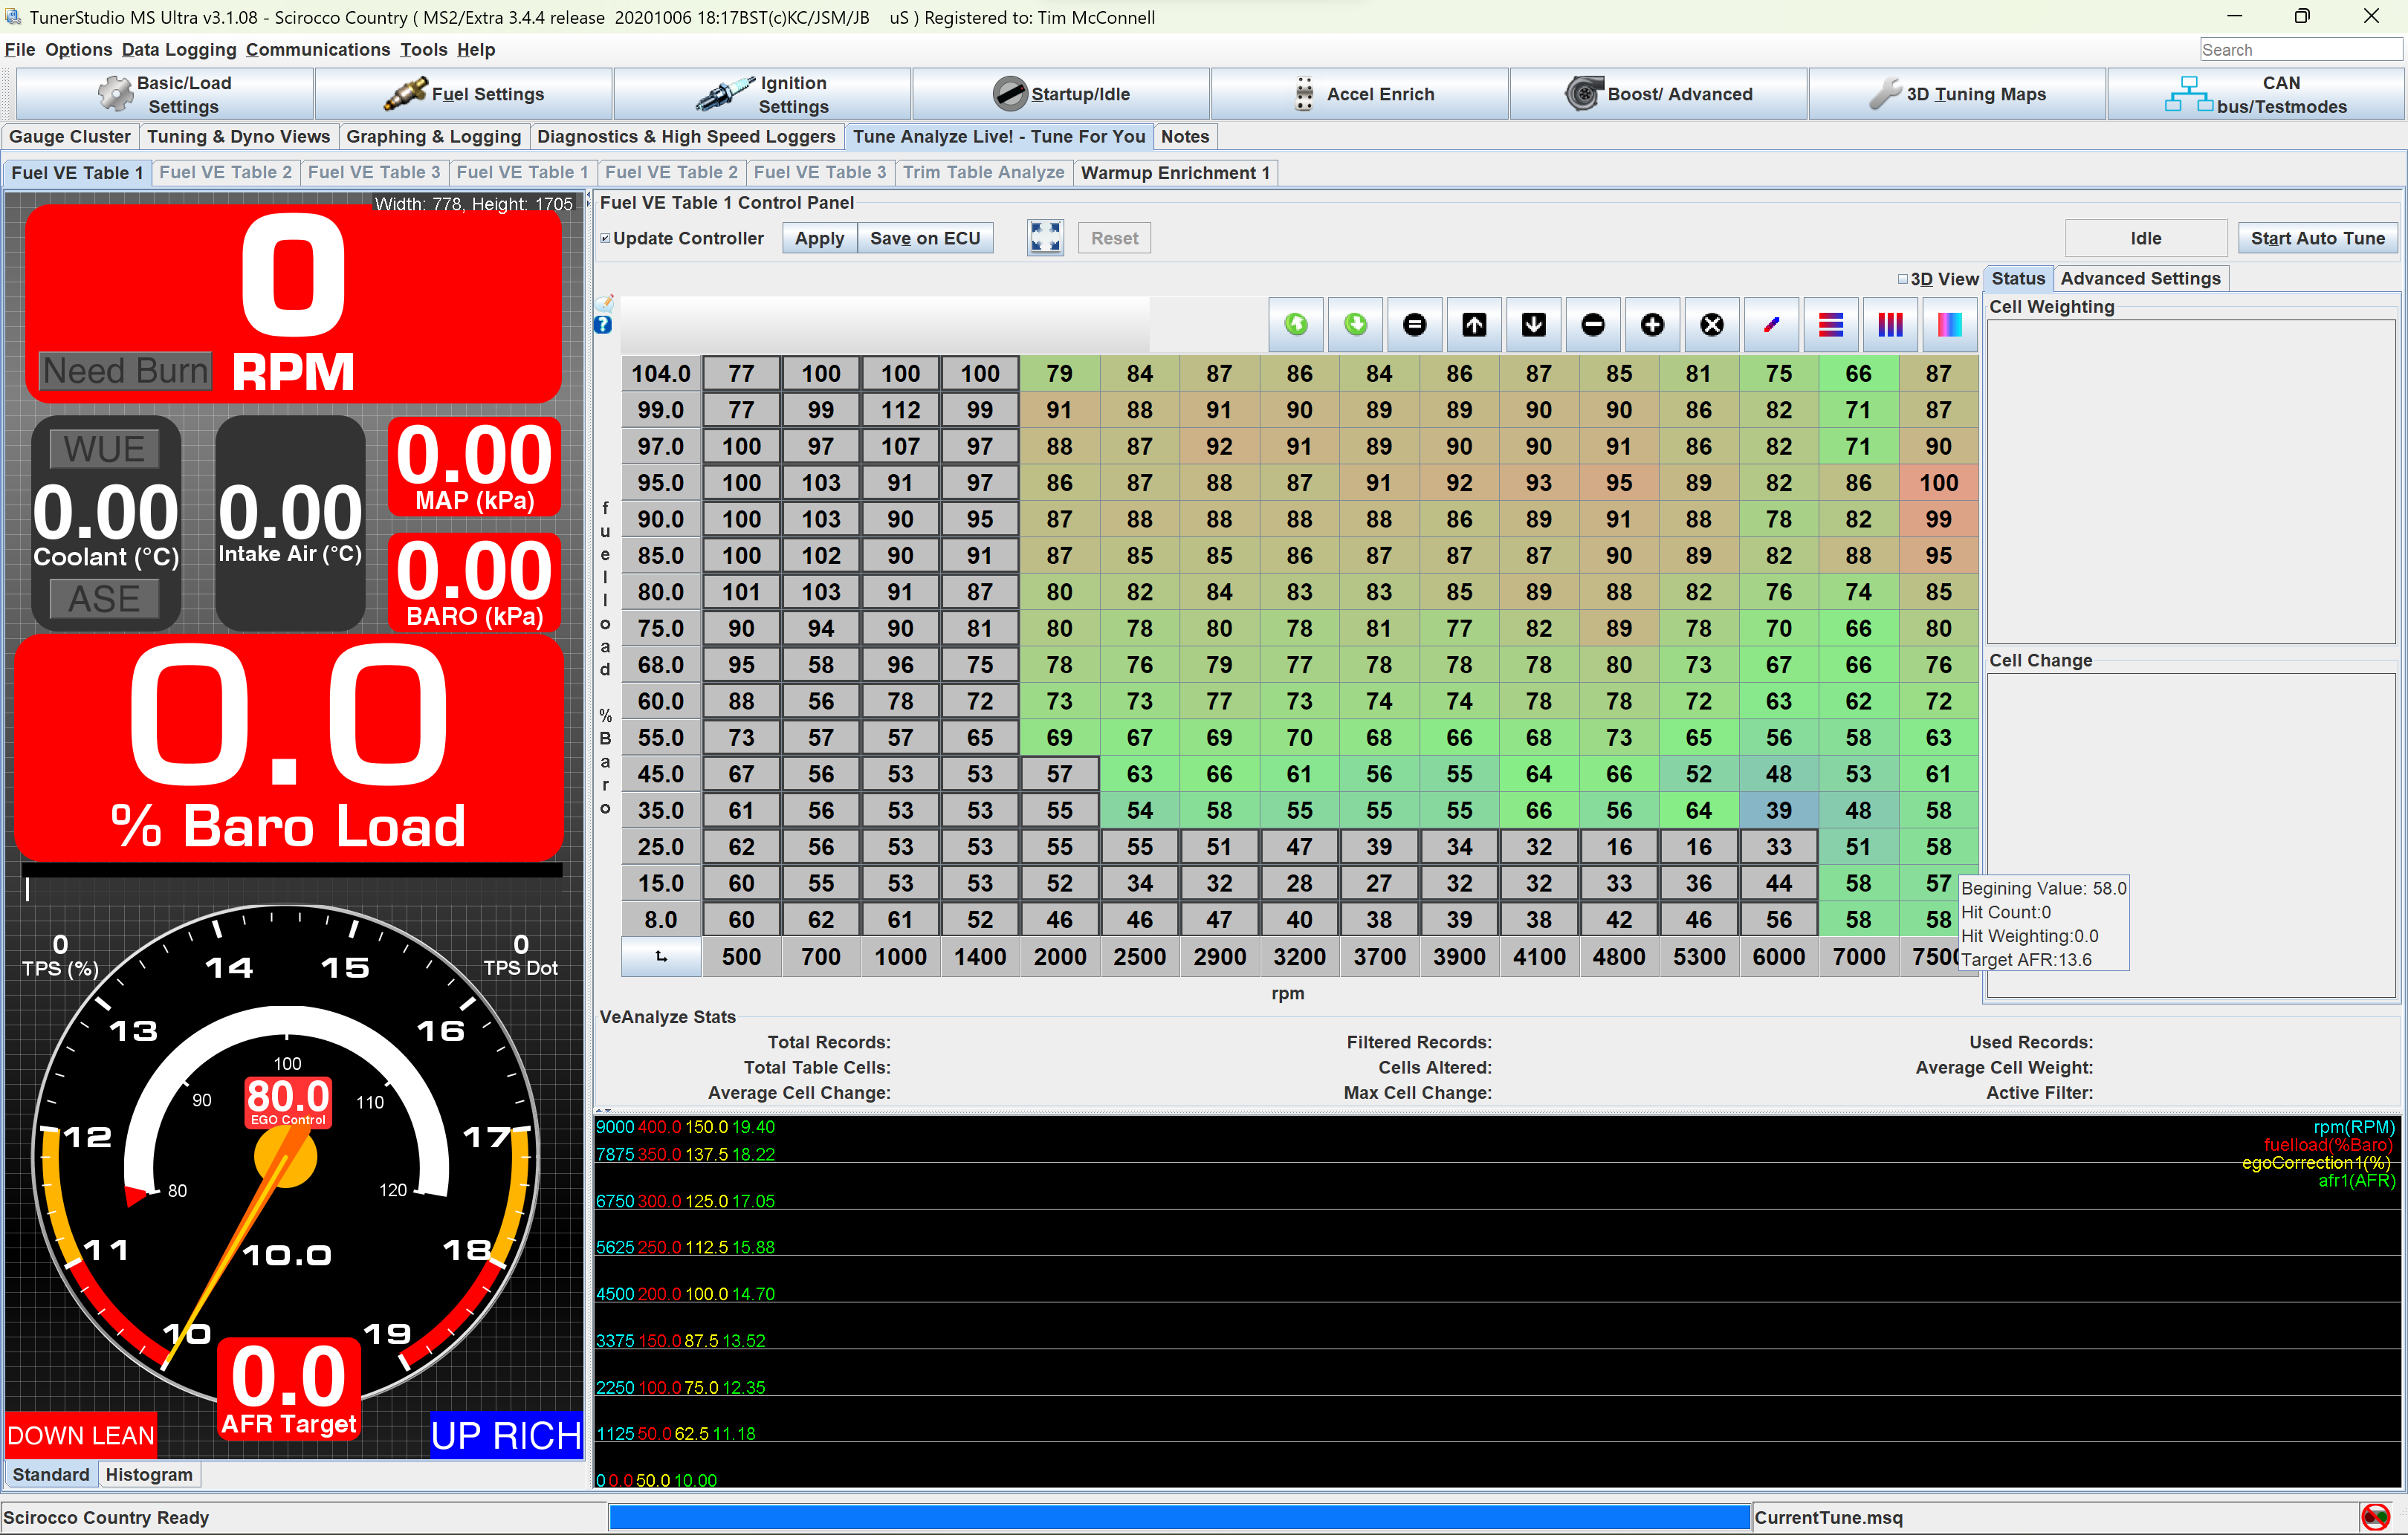
I’ve reached the point of a pretty good running car. This configuration is for my car as it is today, December 3rd, 2023. It’s got a 1.8L 8v JH engine, Cabriolet Digifant intake manifold, Corrado G60 injectors, Passat 16v throttle body with TPS, and a knock-sensing ignition system from a 1985 GTI. This is a fuel-only install, and the RPM signal is coming from the knock computer.
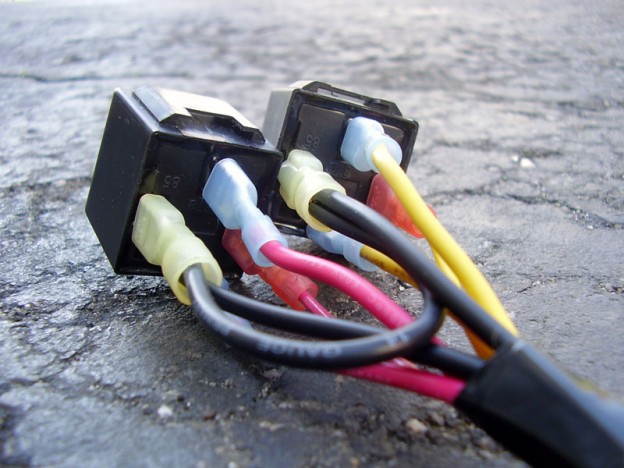
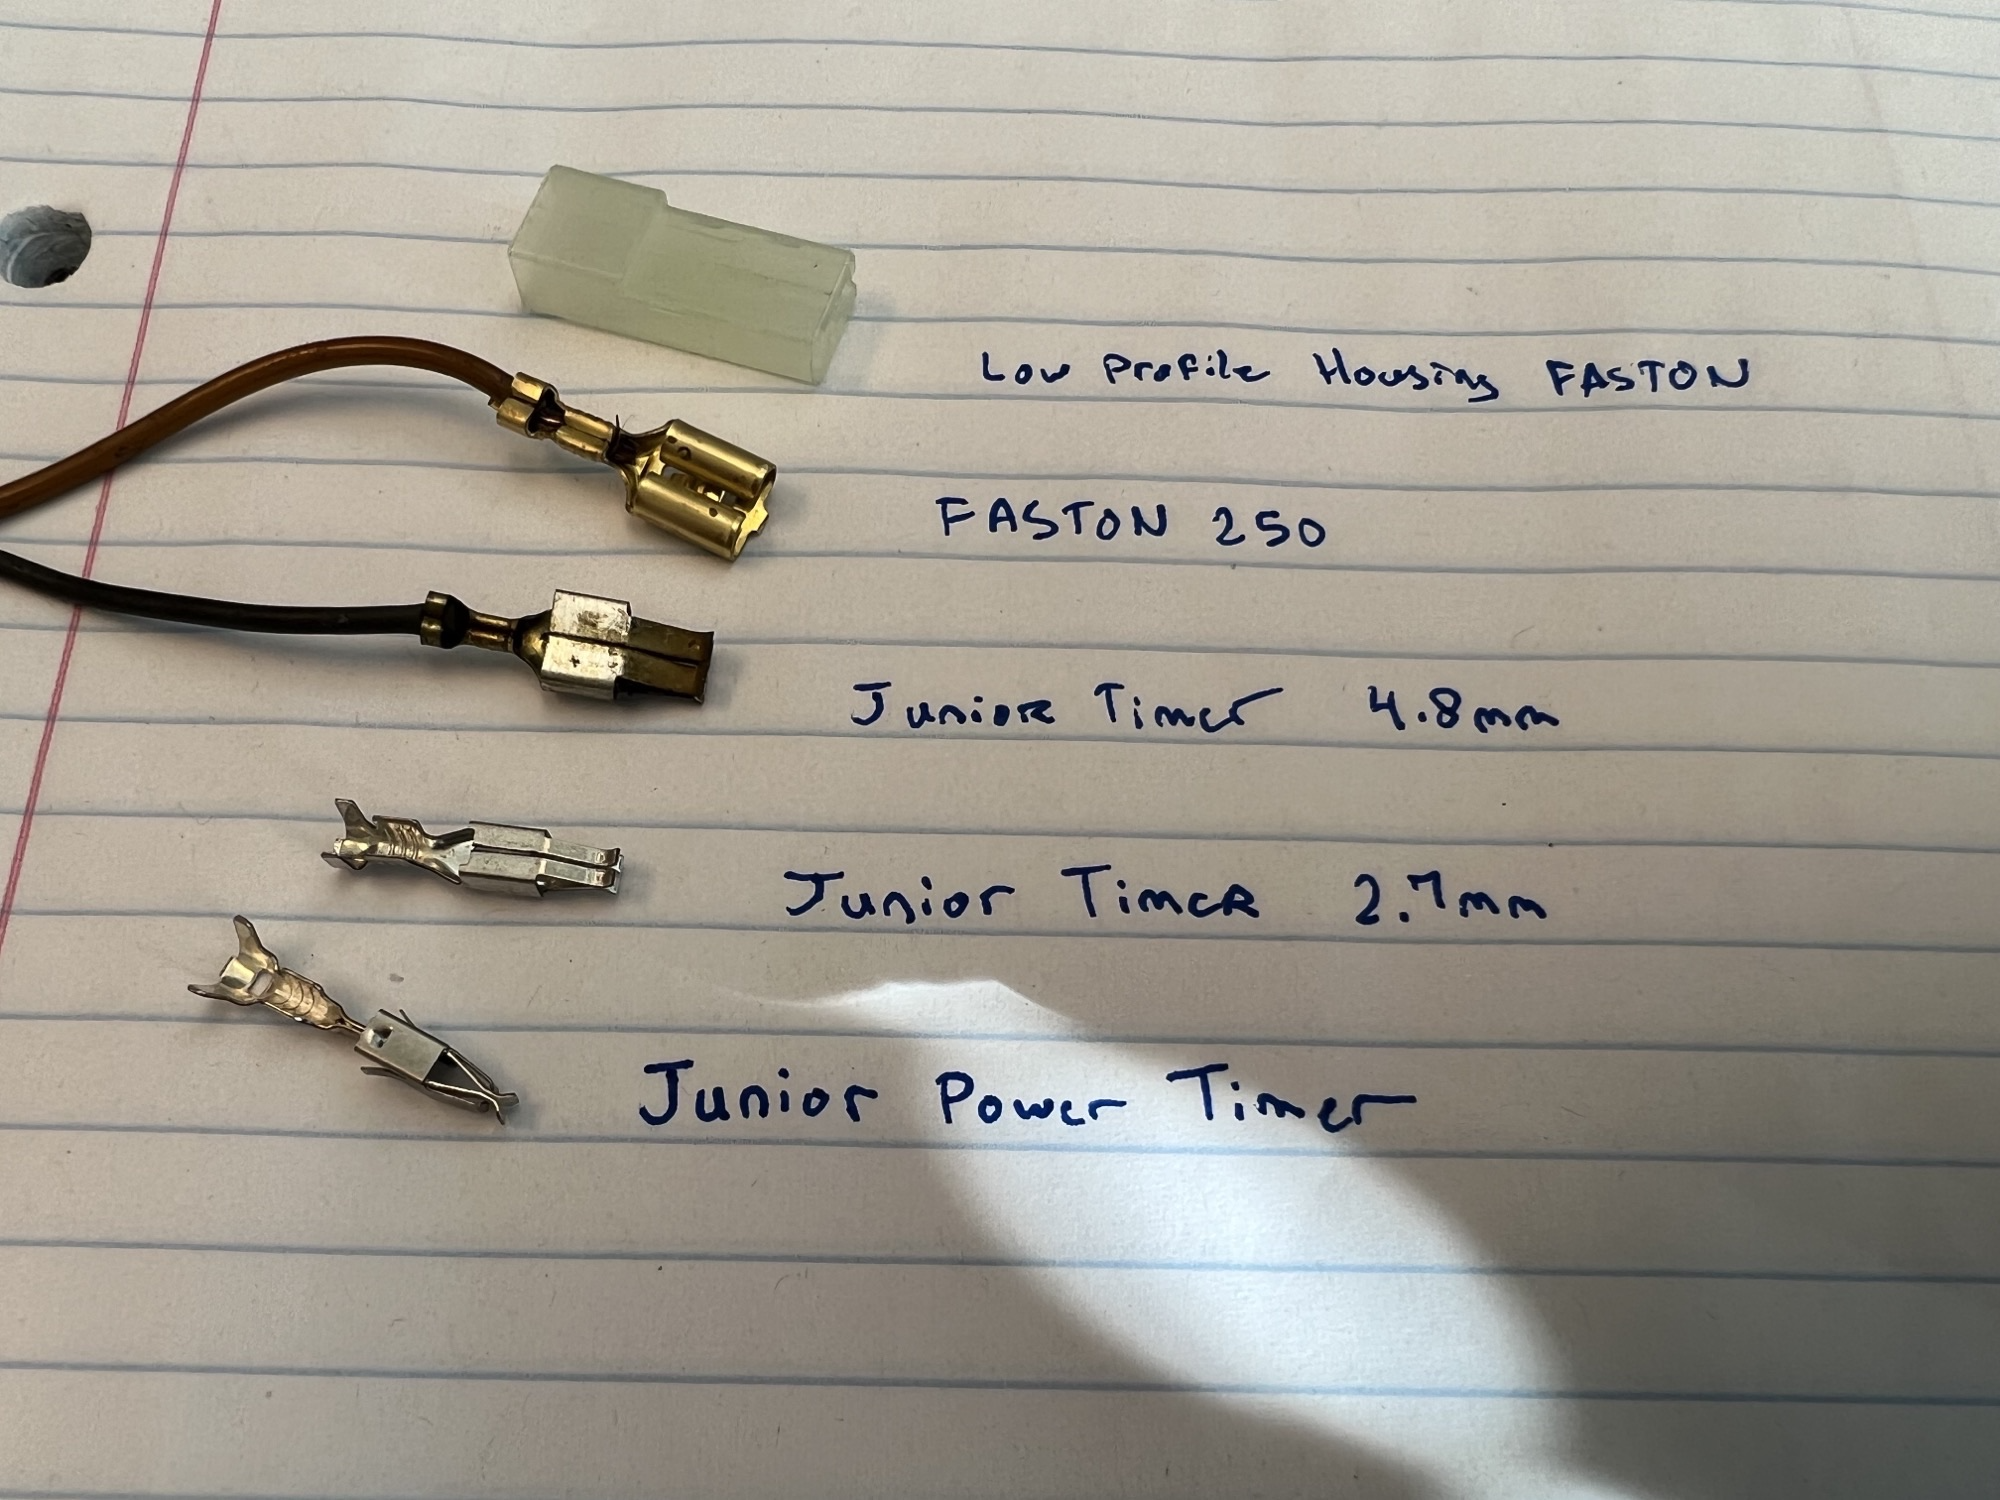
There are two main types of terminals used in early watercooled VWs. The first style is the 1/4″ quick-disconnect terminals – called FASTON. The other type typically goes into multiple contact plastic housings. While it is most commonly know as a fuel injector connector, the correct name is Junior Timer and was made by AMP.
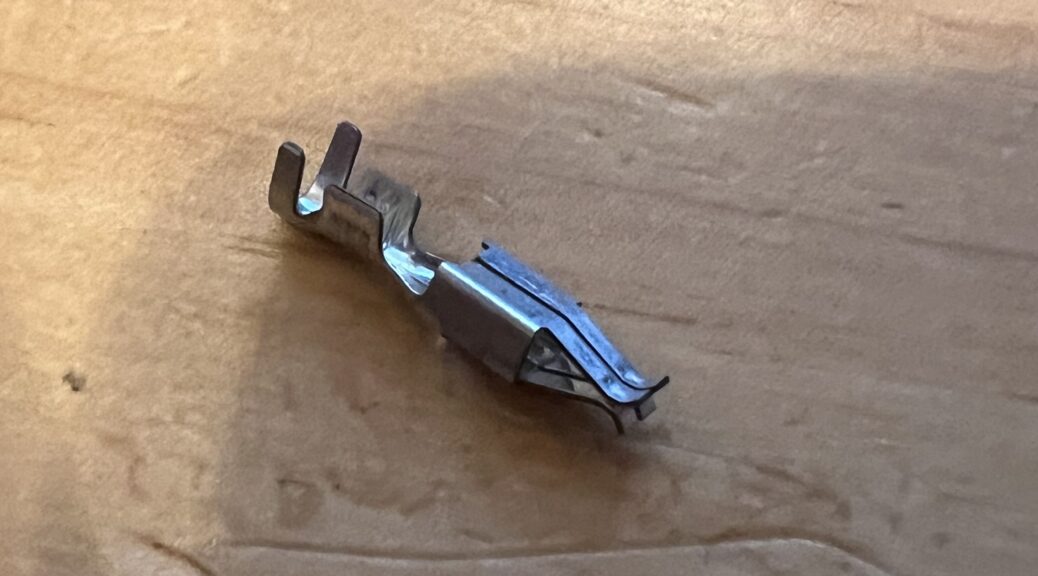
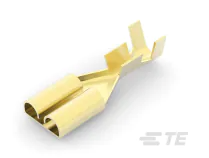
The type of crimp is called an F-crimp. This is sometimes referred to as open barrel and is similar to GM/Delphi Weatherpack/Metripack crimping. This is an open, double barrel crimp. They usually have a section that crimps a wire, and a larger section that makes a mechanical connection with the wire insulation. This crimping method is easily repeatable, reliable and more corrosion resistant than soldered connections.
These part numbers can be found on electronic suppliers such as Mouser or Digi-Key.
Photo of several styles of terminal
Fuel Injector Type Terminals
The 2-pin connectors used everywhere on VWs, Audis and many other brands. These are commonly known as Bosch connectors, AMP connectors, or fuel injector connectors. They are actually called Junior Timer connectors. The company currently making them is TE Connectivity (Formerly known as Tyco Electronics and AMP).
The later series called Junior Power Timer has an extra stainless steel cantilever spring, and an additional locking tab. These are used on Audis, and on later VWs. They are generally compatible with Junior Timer housings.
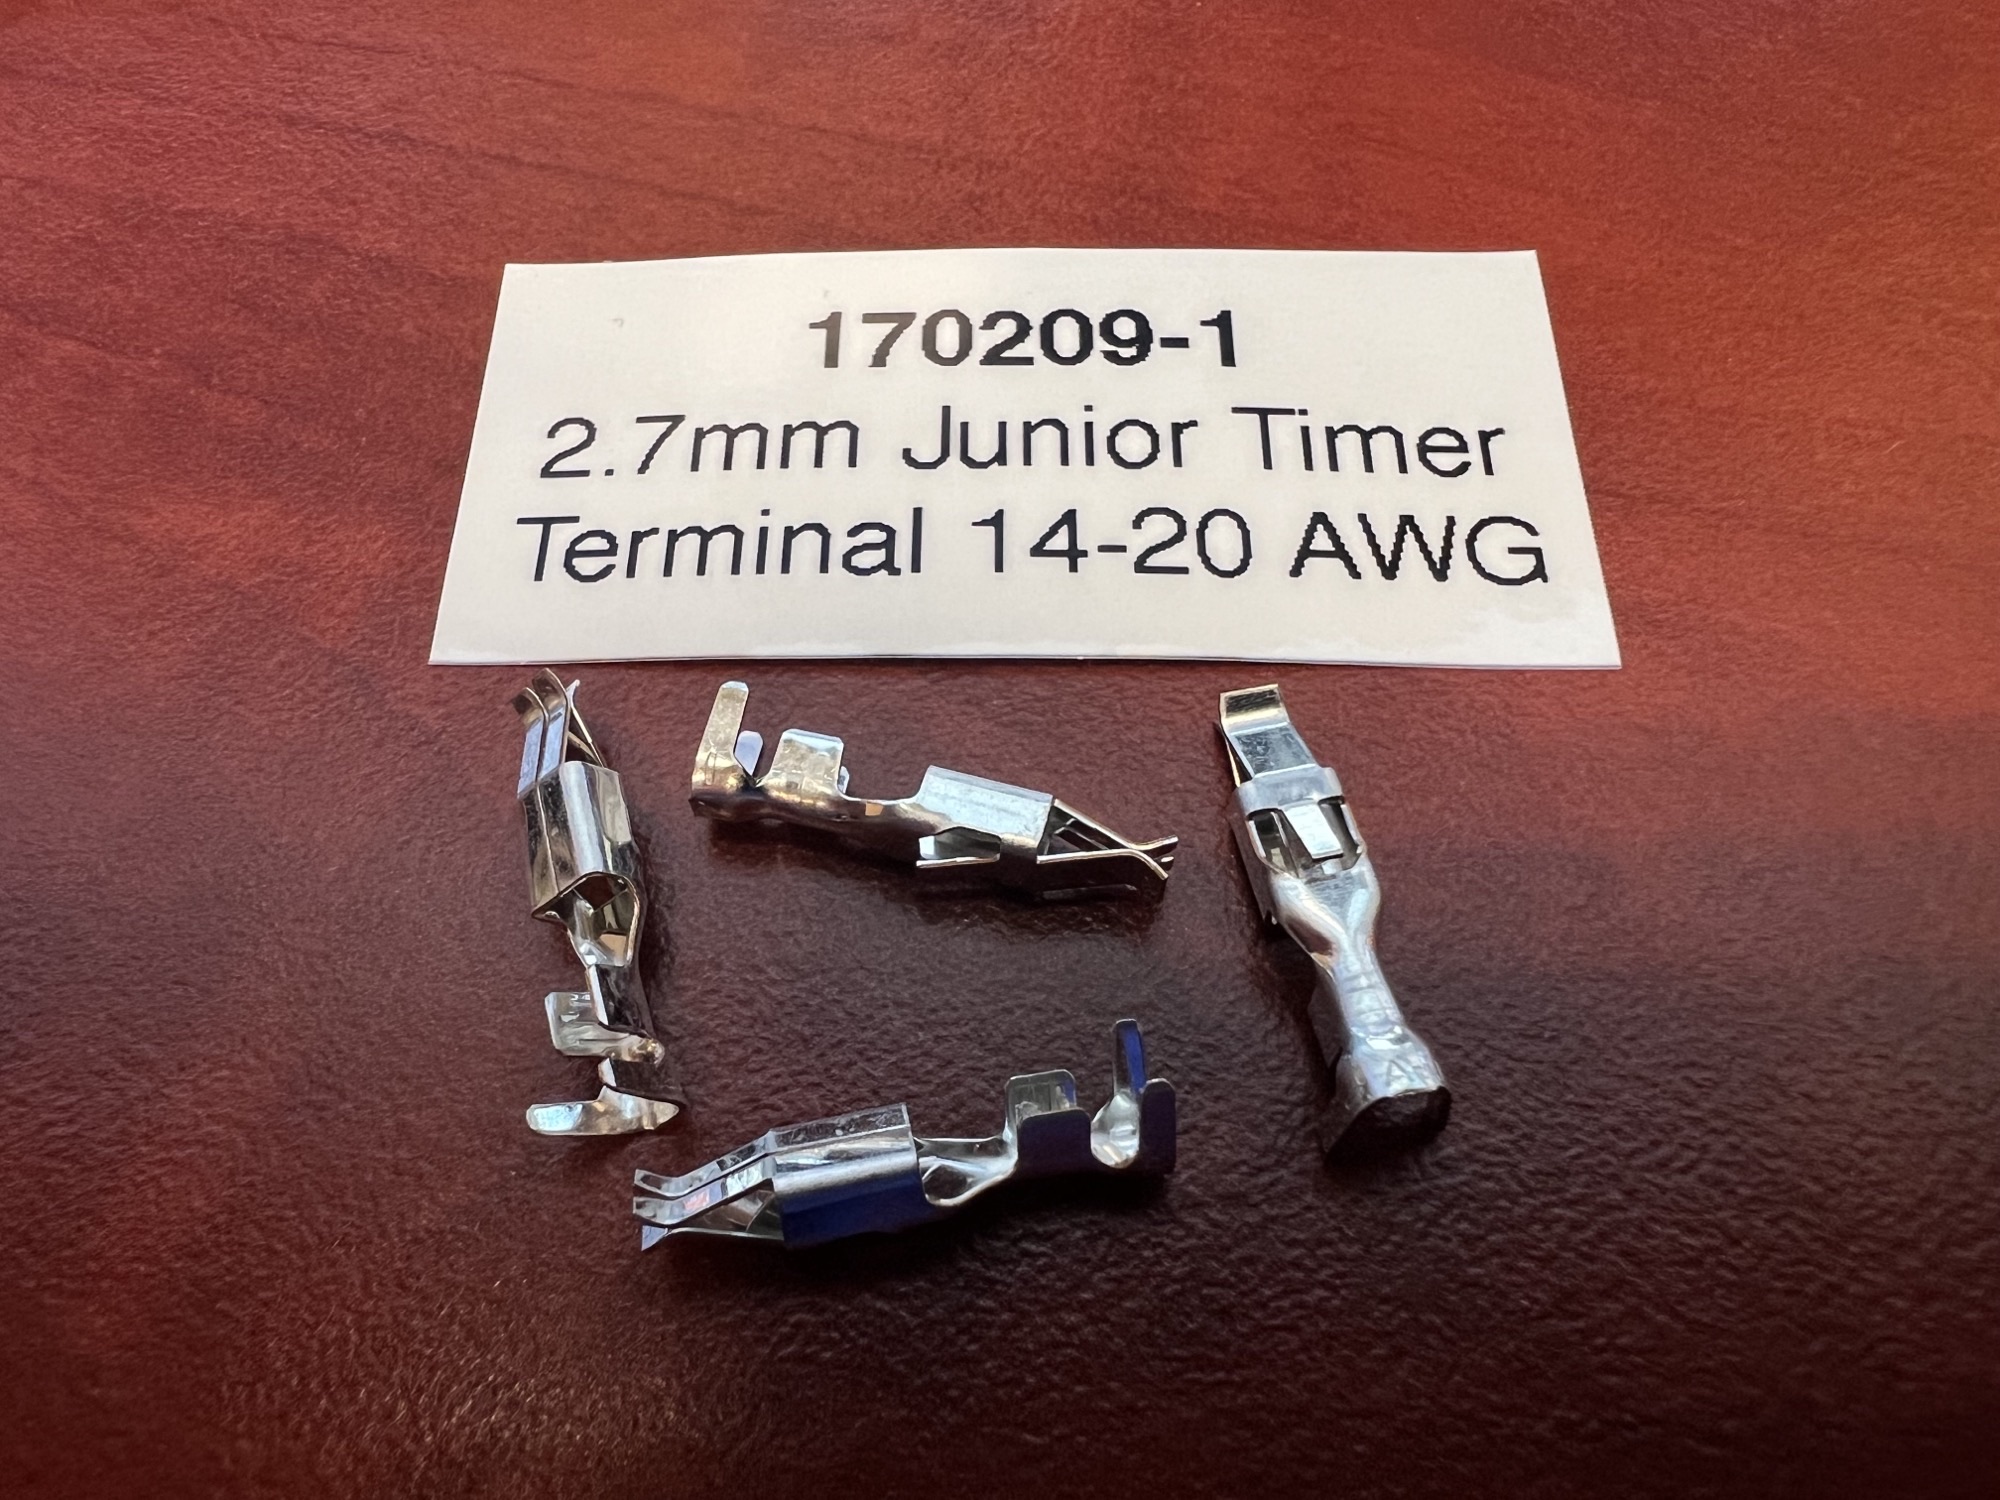
170209-1
P/N: 170209-1 Name: Junior Timer 2.7mm receptacle Wire Size: 14-20 AWG Max power: 24A Material: Copper contact with tin plating Max Temperature: 125°C Locking Lance: Yes, 1 on back
This is the standard receptacle terminal with one locking lance. The width of the terminal fingers is about 2.7mm. This is used in various places:
Cold Start Valve
Aux Air Valve
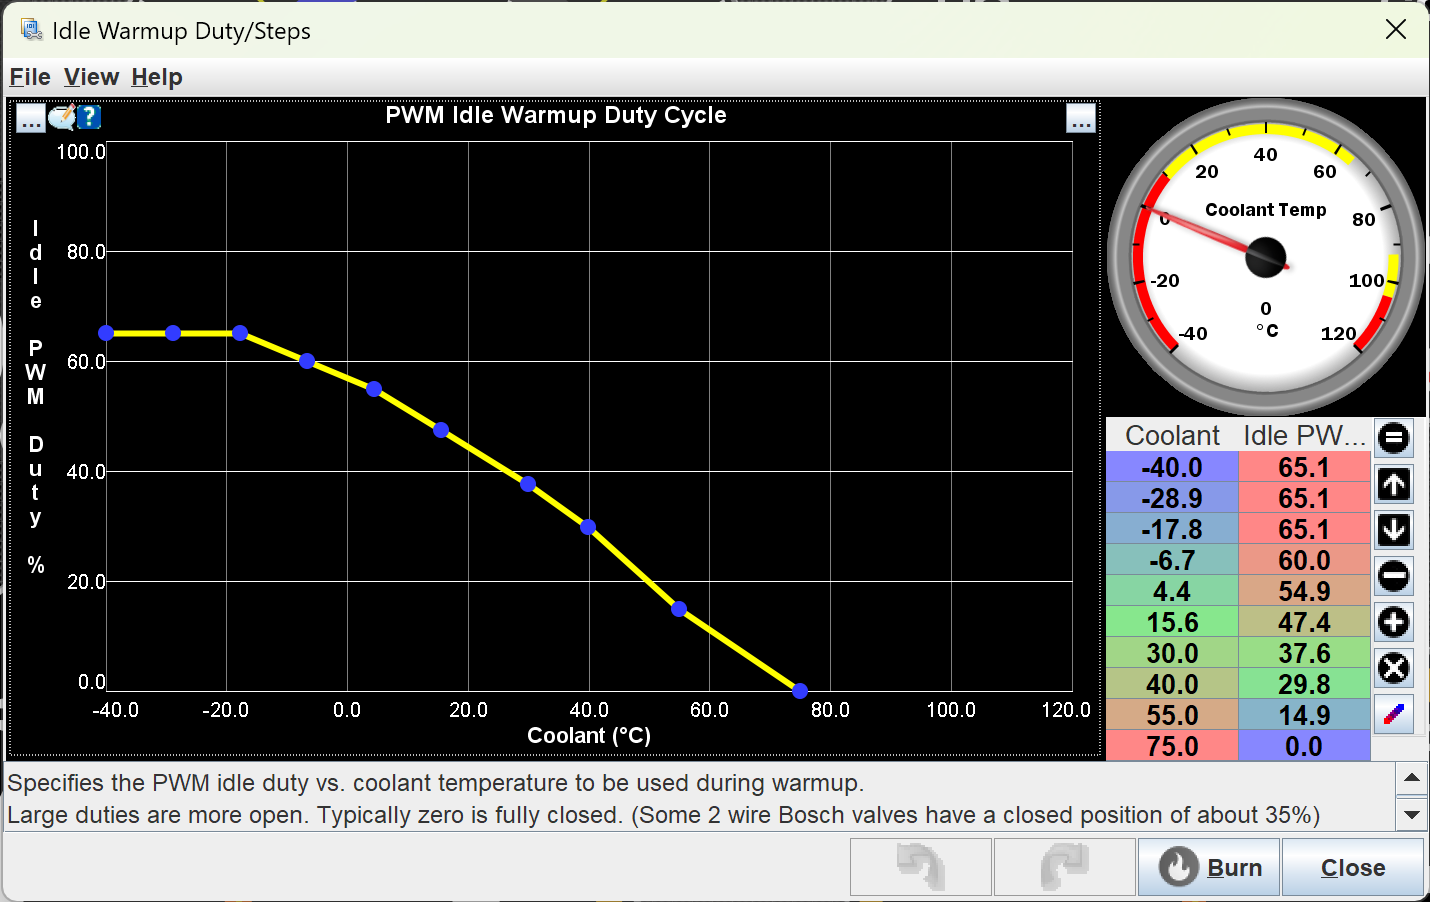
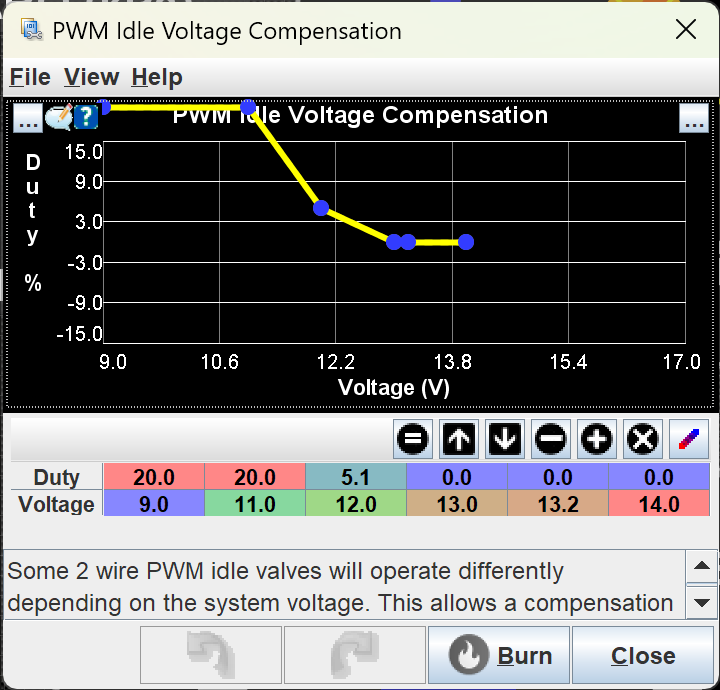
Idle Boost Valves (2-pin on/off and 3-pin variable on 16Vs and Digifant)
Warm-up Regulator
Frequency Valve on CIS-Lambda
Differential Pressure Regulator ON CIS-E and CIS-Motronic
Fuel Injectors on Digifant
Throttle Position sensor on some Digifant and Motronic systems
Oxygen Sensor Heater connector on 16V and many later cars
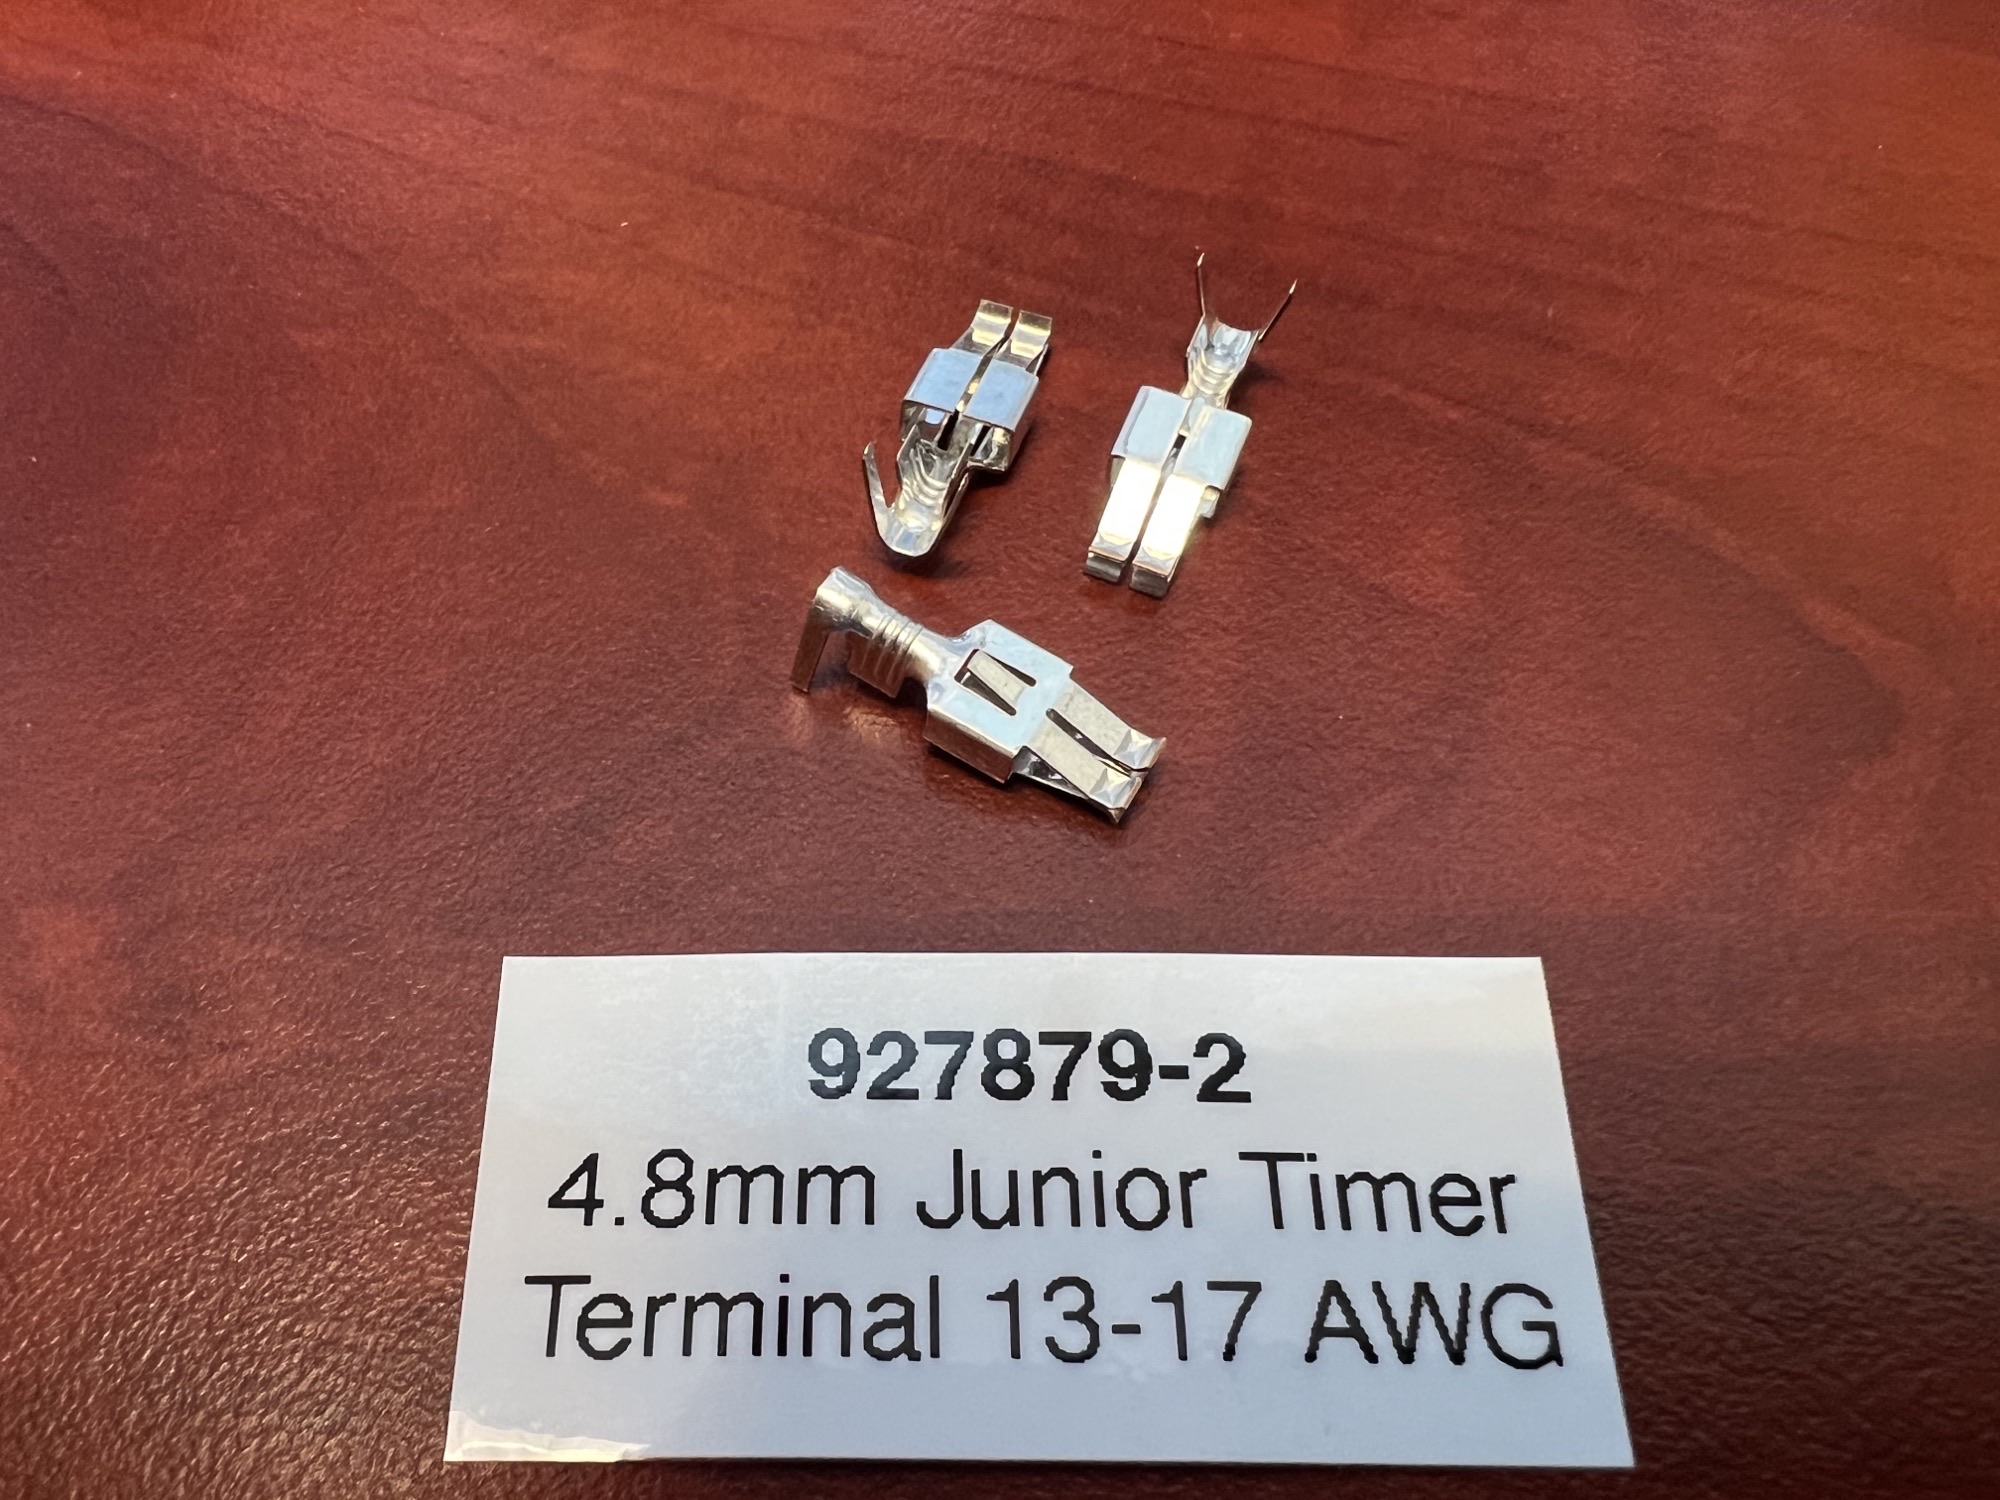
927879-2
P/N: 927879-2 Name: Junior Timer 4.8mm receptacle Wire Size: 13-17 AWG Max power: 40A Material: Copper contact with tin plating Max Temperature: 125°C Locking Lance: Yes, 1 on back
This is a wider contact, only used in a few places:
Transfer Pump connector inside the fuel tank on 2-pump cars such as 1984.5 – 1992 Sciroccos and later Cabriolets
Possibly the terminal used in the Mk3 starter solenoid connector
1/4″ Quick-Disconnect Receptacle Terminals
These are known as FASTON receptacle terminals. They are described as .250, 6.3x18mm, or just 1/4″ quick disconnects. Sometimes incorrectly described as spade terminals. The measurement is based on the width of the tab. They have a locking lance on the back for locking into terminal housings. They are very common in many cars, and other applications. Just a few examples of where they are used:
Ground connections at fuse panel (with no housing)
Many single connectors on the back of the fuse panel
Throttle wide-open switch on CIS cars
Oil Pressure sensors
Oil and coolant temperature senders
Radiator fan switch connector
Various in-harness connectors
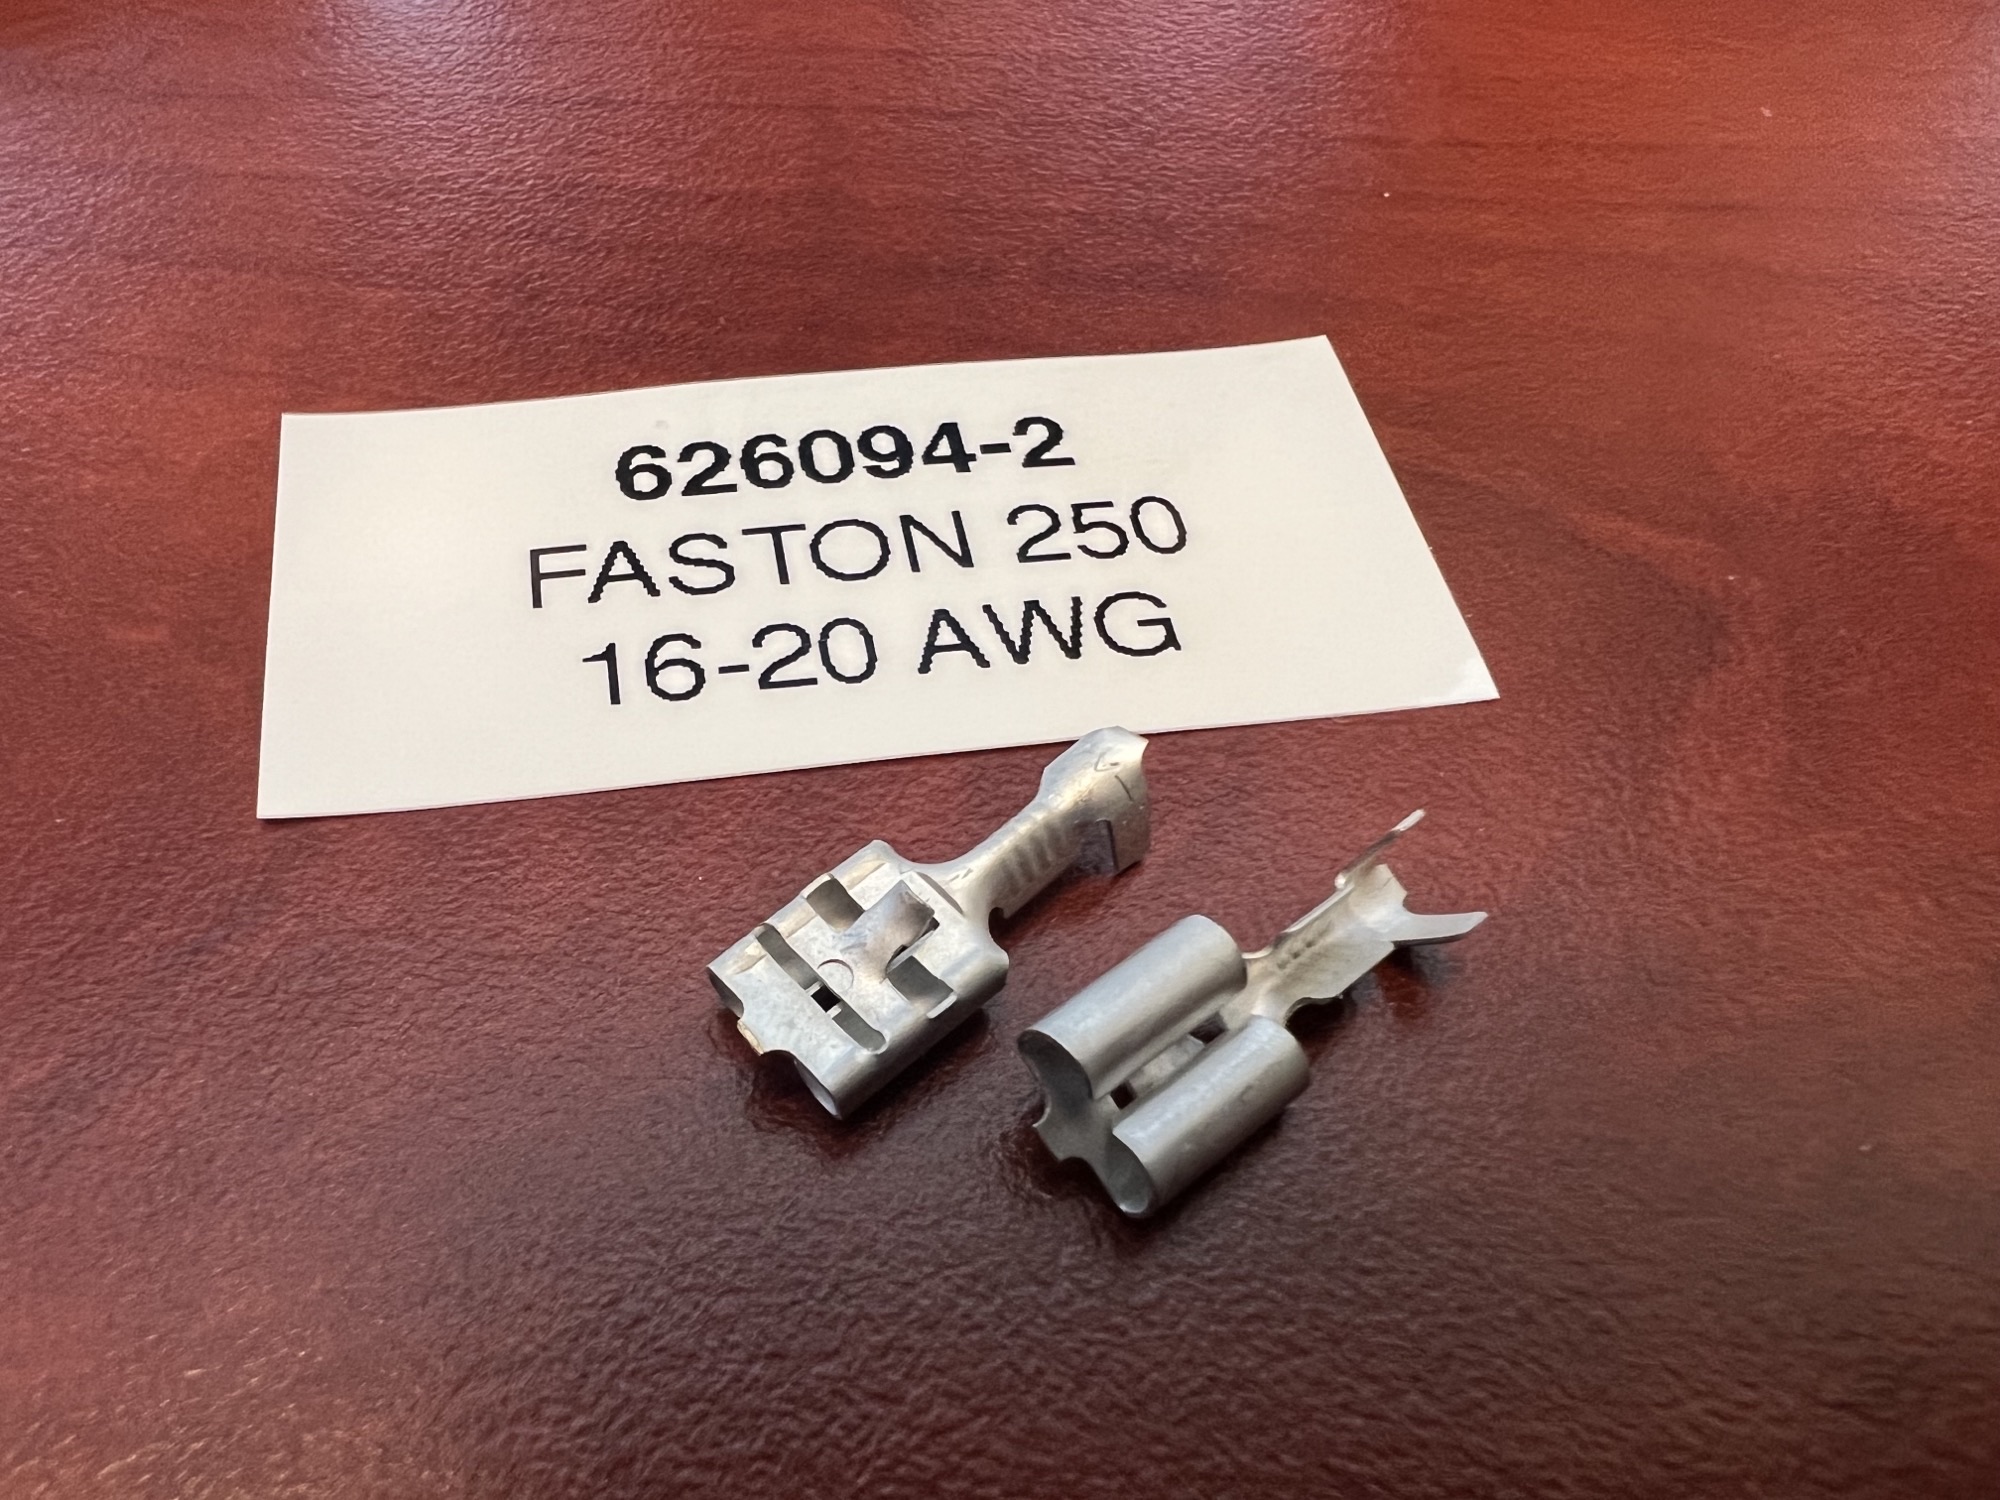
626094-2
P/N: 626094-2 Name: FASTON 250 Wire Size: 17-20 AWG Max power: 28A Material: Brass, tin plating Locking Lance: Yes
42238-2
P/N: 42238-2 Name: FASTON 250 Wire Size: 14-18 AWG Max power: 28A Material: Brass, tin plating Locking Lance: Yes
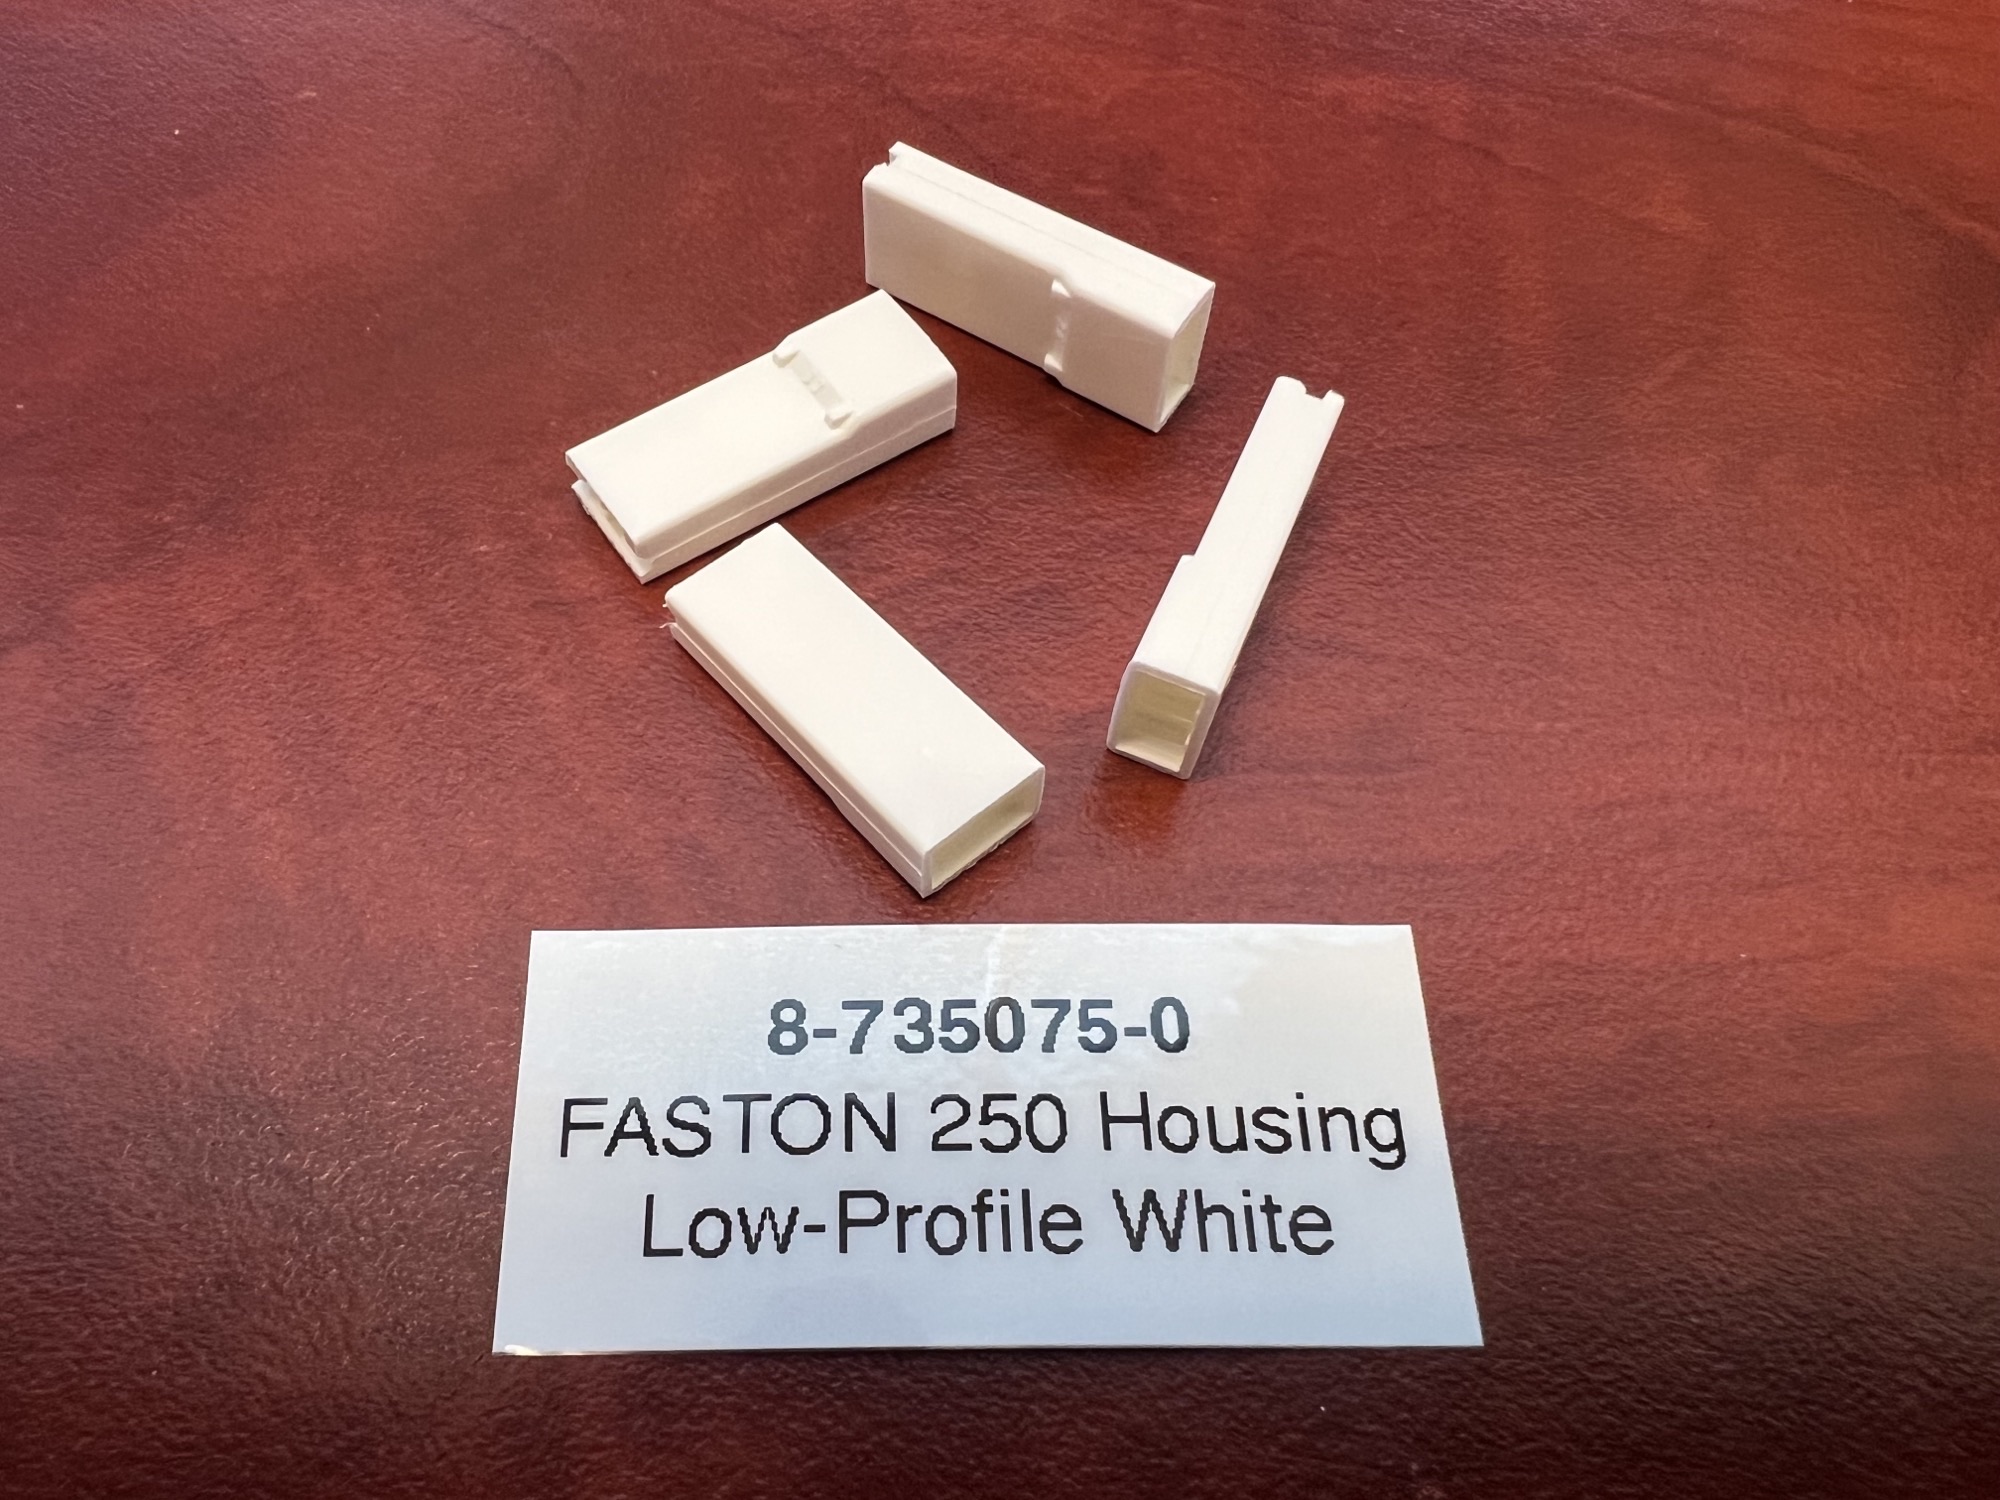
These are the clear plastic housings that are normally over these connectors. This is a clear/natural plastic, and matches the original types typically in 70s and 80s VWs. The locking lance on the FASTON terminals will lock into this.
8-735075-0 Low profile clear plastic housing for 1/4″ connectors with locking tab
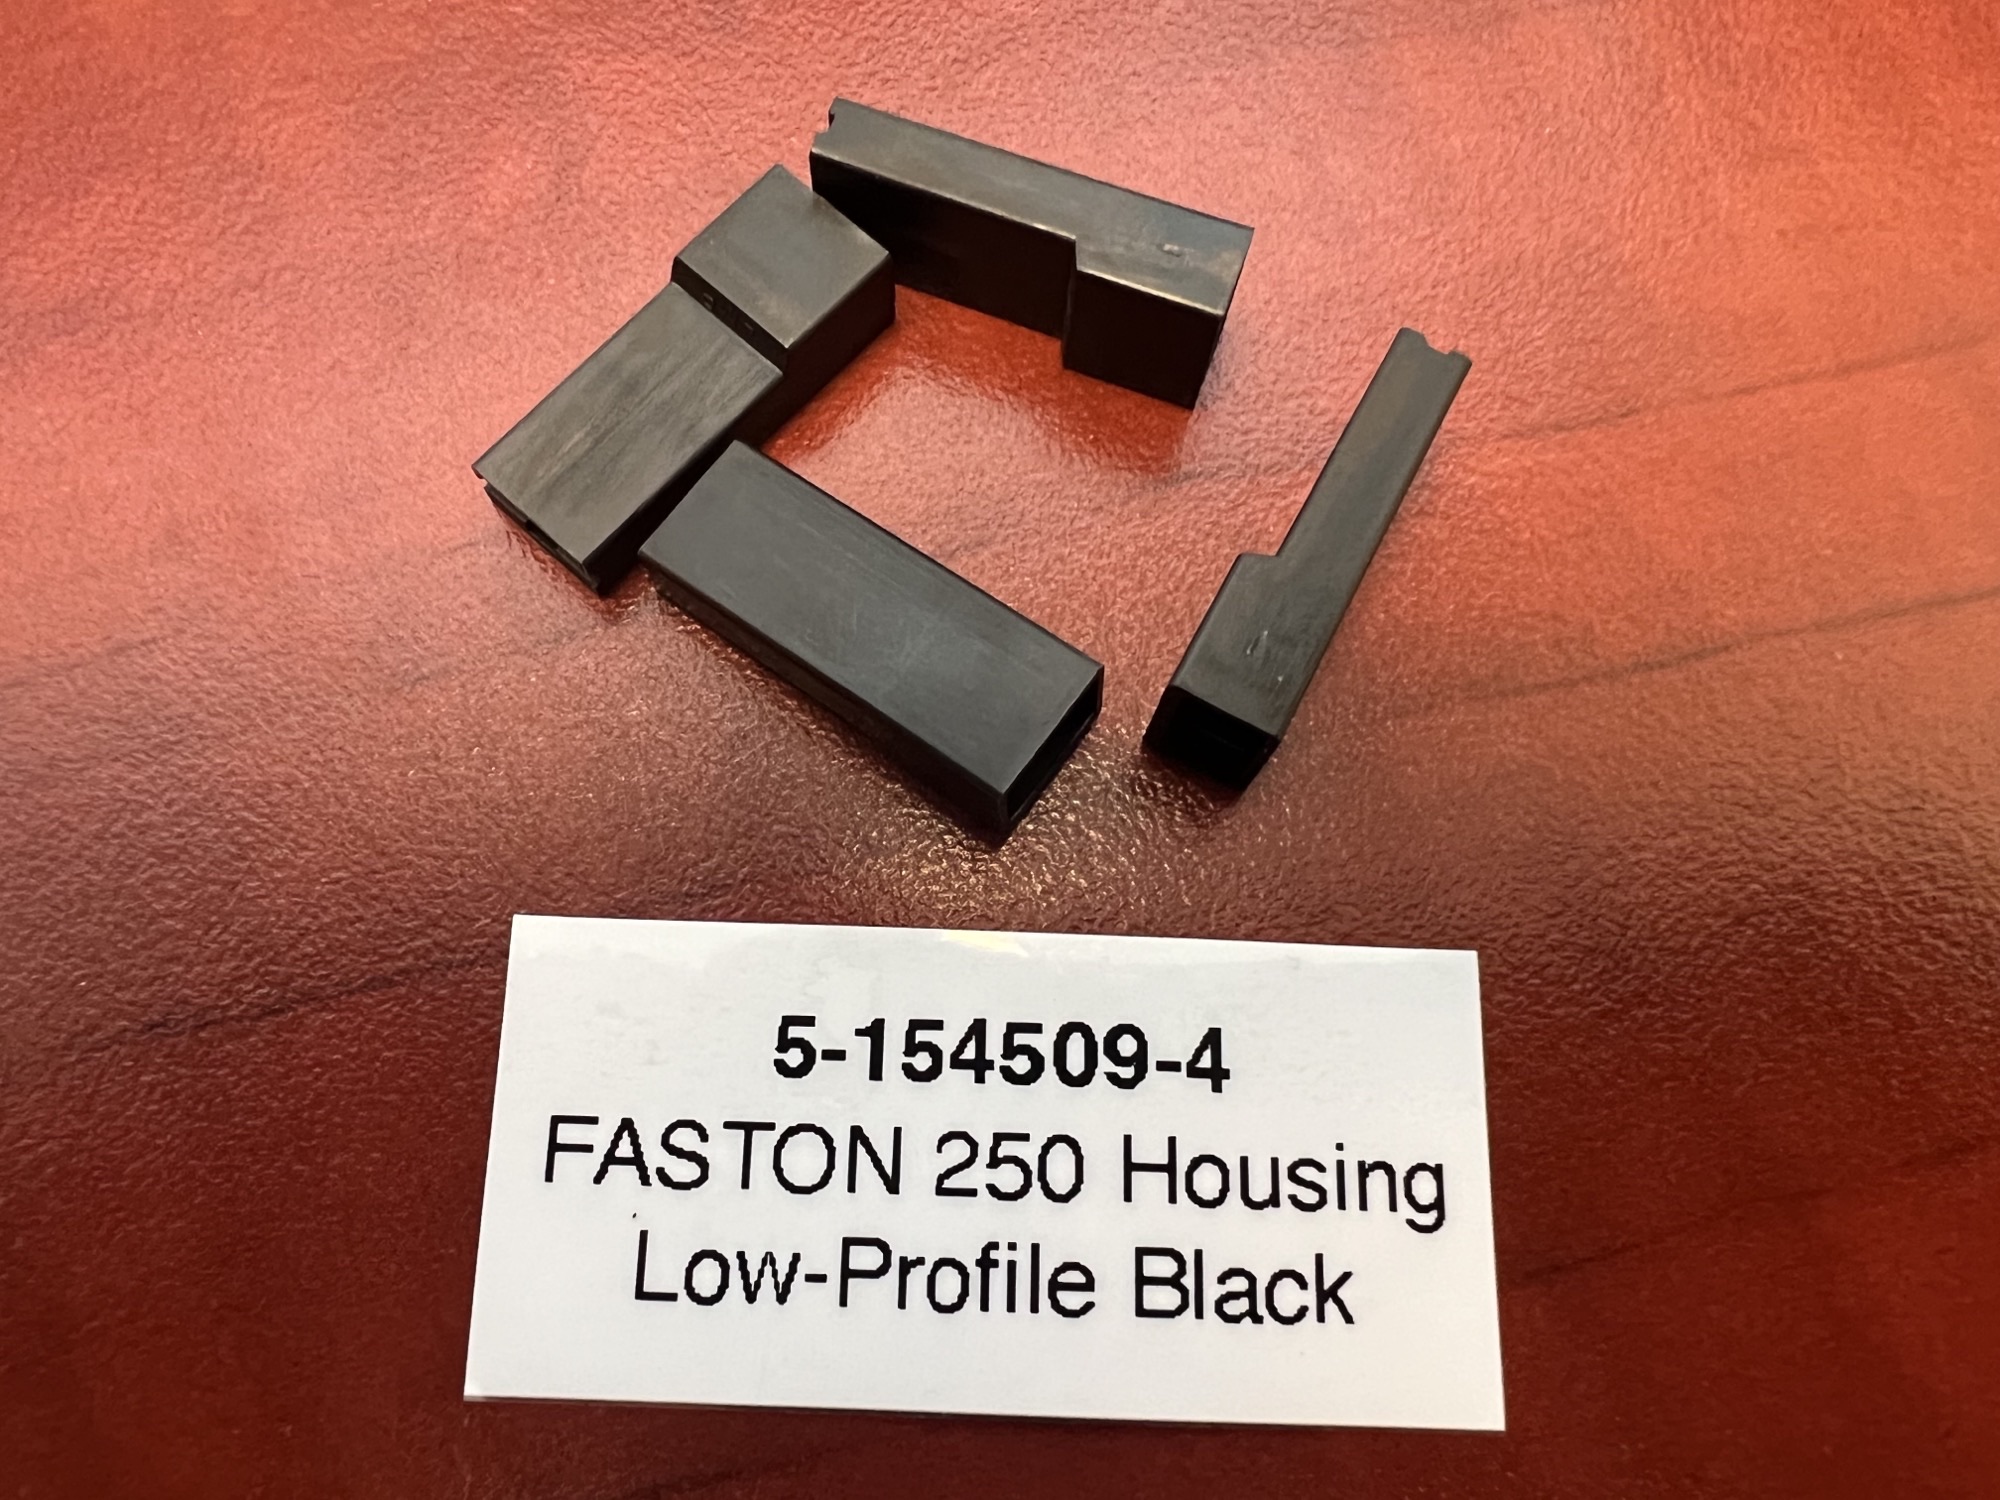
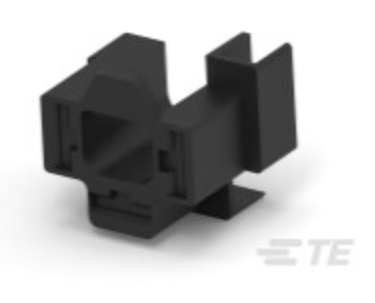
P/N: 5-154509-4 Name: Single contact, FASTON 250 housing Color: Black The black variation of the plastic housing. This is used specifically on the throttle body open-throttle switch connectors on some cars.
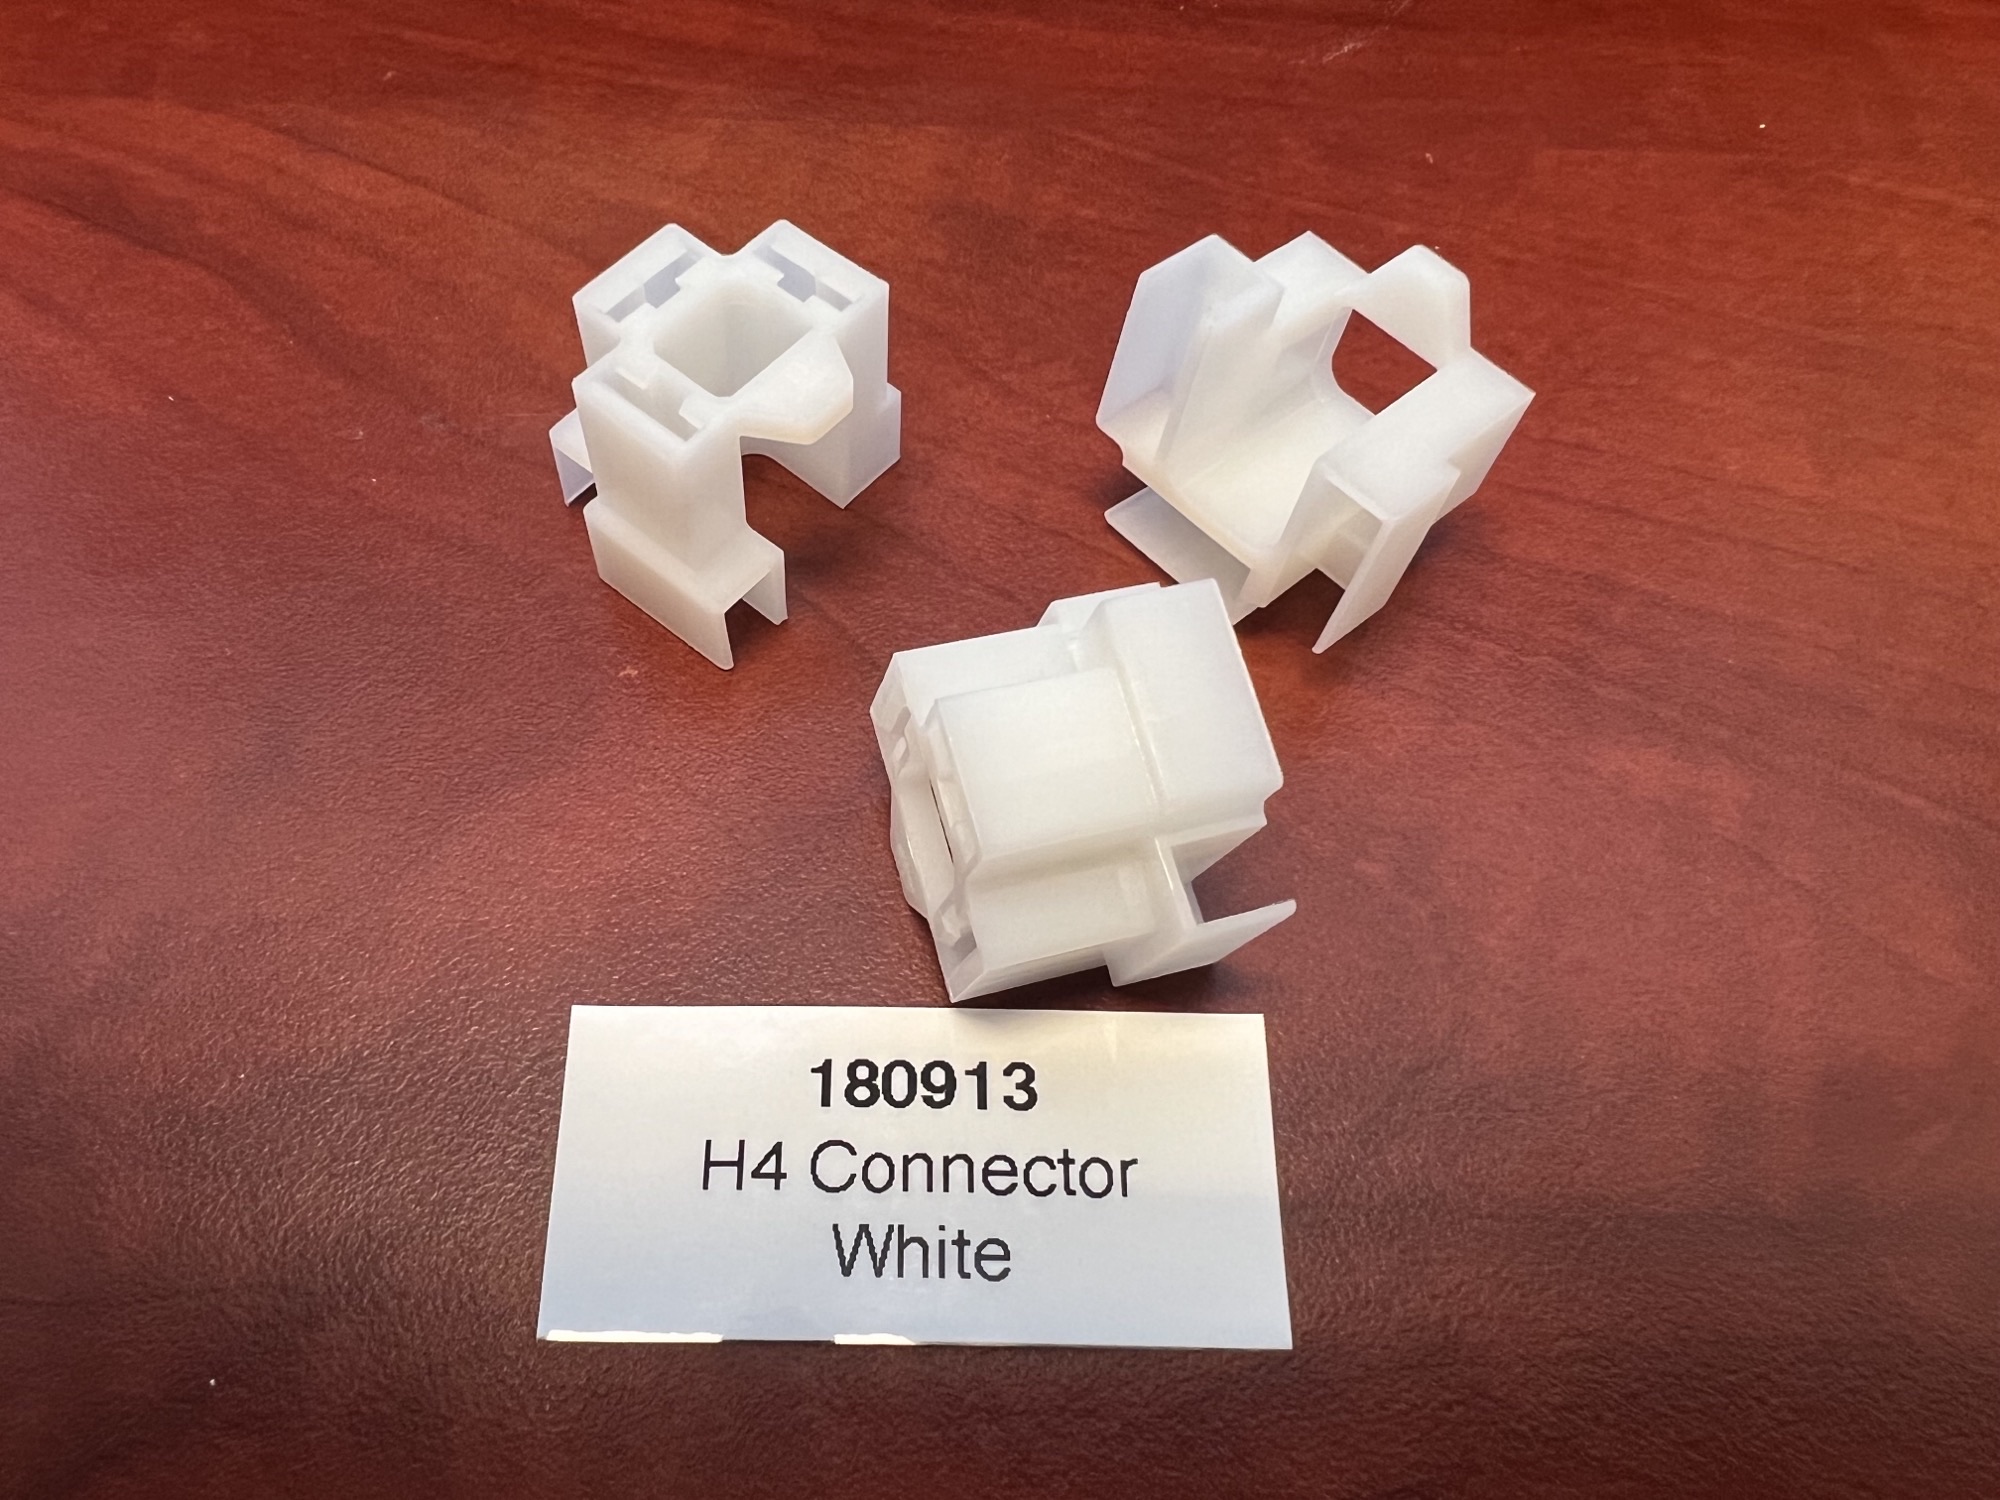
Headlight Connectors
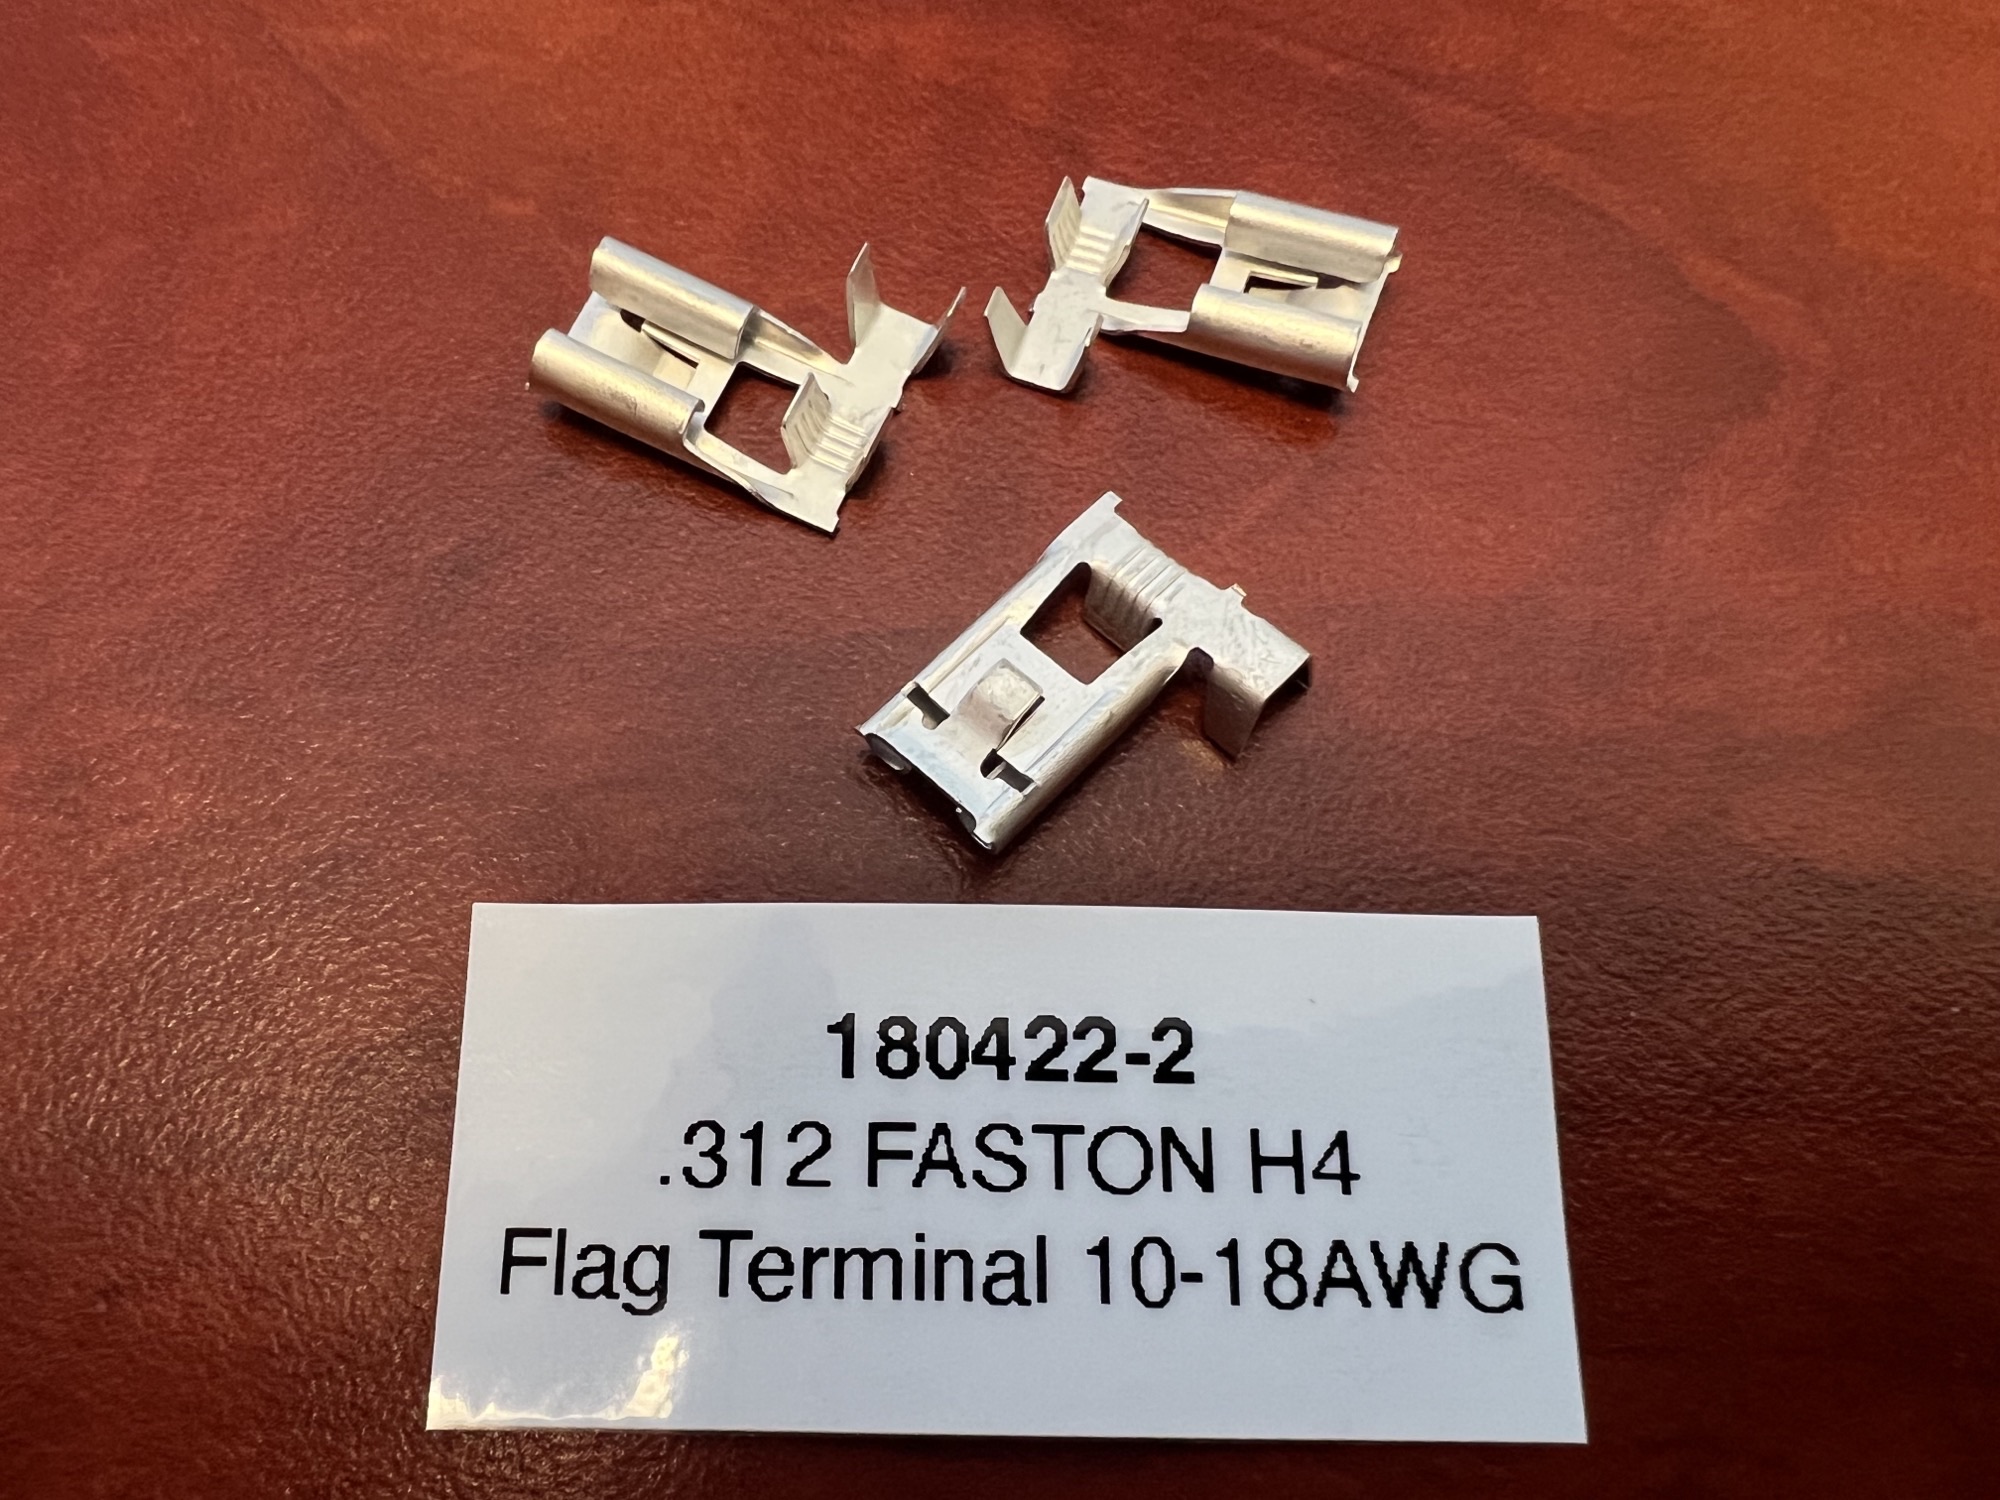
The H4/9003 bulb and the sealed beams use a larger size .312 or 8mm/7.92mm connector. The American size of 5/16″ (0.3125″) The flag terminal style is seen often here in aftermarket connectors for a low profile.
180422-2
P/N: 180422-2 Name: 312 Series FASTON 90 degree flag terminal Wire Size: 10-18 AWG Max Power: 28A Material: Brass with tin plating Locking Lance: Yes
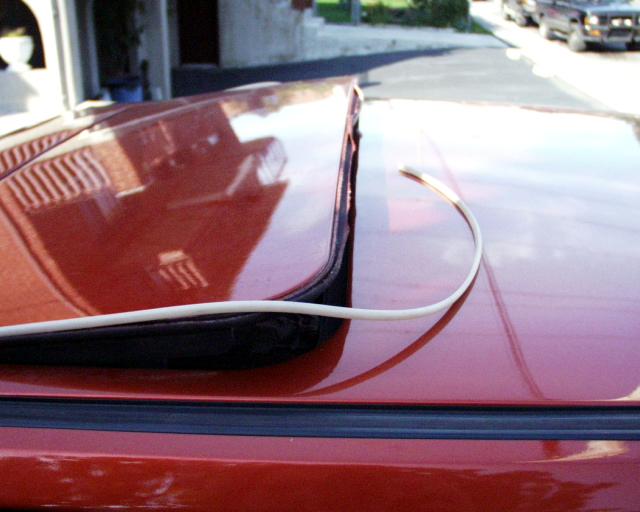
Leaking slow hard to crank sunroof? This ATS technote will show you how to replace the seal and remove, adjust, and lubricate the sunroof to get it working again.
Most of this is applicable to the JH engine (1.8L 8v) but much of it covers more related engines. This is a running list that will be updated often, I’m measuring things as I go.
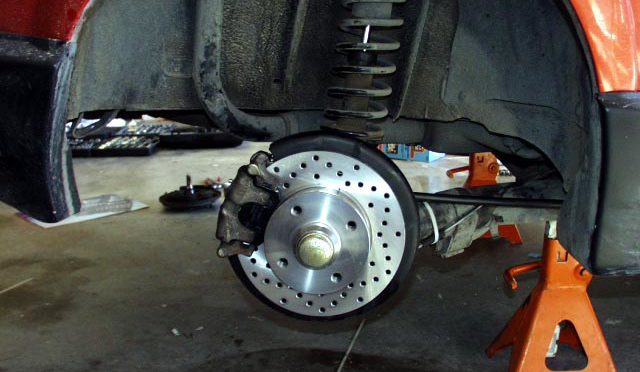
Water Pump
Pump to block – QTY-2 M8x1.25x30mm, QTY-2 M8x1.25x50mm. all are 13mm hex-head drive.
Water pump housing – QTY-8 M6x1.0x18mm flanged. 10mm hex-head drive.
Pulley bolts – Non-A/C M8x1.25x14mm socket head (Allen) 6mm drive.
Rotor screws are M6x1.0x14mm with a flat head – FH (countersunk), various lengths are available. Drive is P3 Phillips. Do not use a standard P2 Philips on these – the head will strip. Similar screws are also used on Honda/Acura, but they use a JIS spec drive. Use anti-seize when installing, especially on the bottom of the head. Late model VW/Audis use a similar part, 16mm long, with a Torx T30 drive instead of the Phillips head.
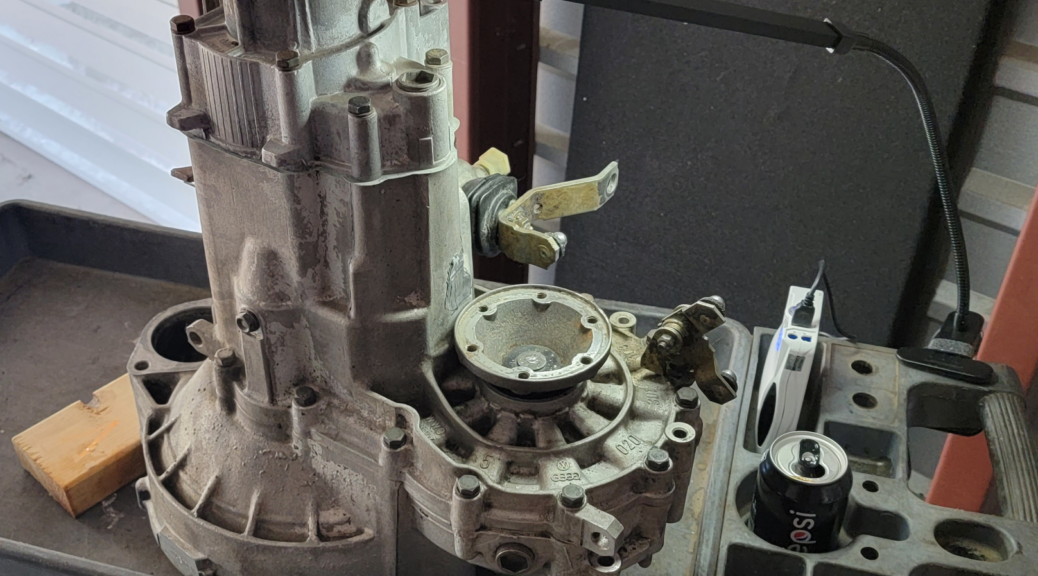
In mid 84, VW change the 020’s transmission from 90mm output flanges to 100mm output flanges. Mainly writing all of this down with what I found out about my 100mm flanges today. I will expand this as I find more information about the earlier transmissions. There was a weird transition period from 83 to 84 where there were two case styles.
Bolts for axles to flanges: M8x1.25 (48mm long) Torque Spec: 45 Nm (33 ft. lbs.) Part Number for 6mm Allen head type: 113 501 229 D Part Numbers for 8mm XZN Triple Square head type: 893 407 237 N91108201 W01331834815 ATM 893407237
Axle Nut Size: M20x1.5 (30mm socket required) This is a self-locking nut (lock nut), and should be replaced every time. Torque Spec: 240 Nm (173 ft. lbs.)
Circlip (Lock Ring) for the differential pinion shaft that goes inside the output flange: VW Part Number 113 311 287 Tool for removing: Lisle 44900 Lock Ring Pliers
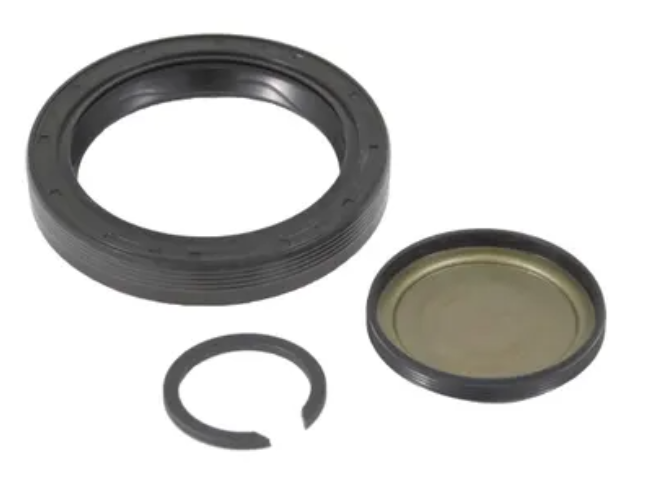
Kit for output shaft seal, including circlip, cap, and seal: 020 498 085G or 020 301 189H
Output Shaft Seal for 100mm flanges (around the outside of the flange): 50mm x 65.2mm x 10mm (ID x OD x Thickness) 1.969″ x 2.565″ x 0.394″ Part Numbers: National / Timken 710651 Febi 01519 Kaco 216415 88996656 020301189E 020301189G 020301189H 020301189M 020301189N 020301189R 020301189S 020301189T 020498189E 020498189G 02M409189 02M409189B
Output Seal for 90mm Flanges (Coming Soon) Older pre-83 cars used a “Fat” seal 36x58x15
Flange Seal – this is a cap that goes inside the flange to cover the pinion shaft with circlip, it separates the viscous CV joint grease from mixing with the gear oil inside the differential: 020 409 289 B
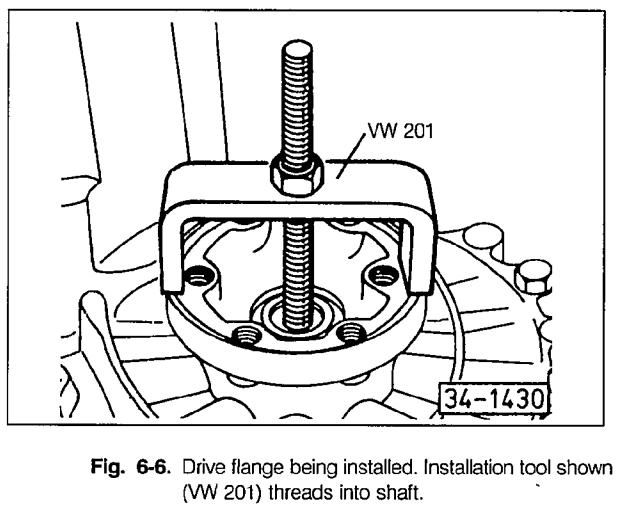
Tool for pushing in axle flange: VW 201 Basically is a M10x1.5 at least 130mm threaded rod with a bent U shape to push down on flange. You will need enough clearance to get the lock ring pliers in.
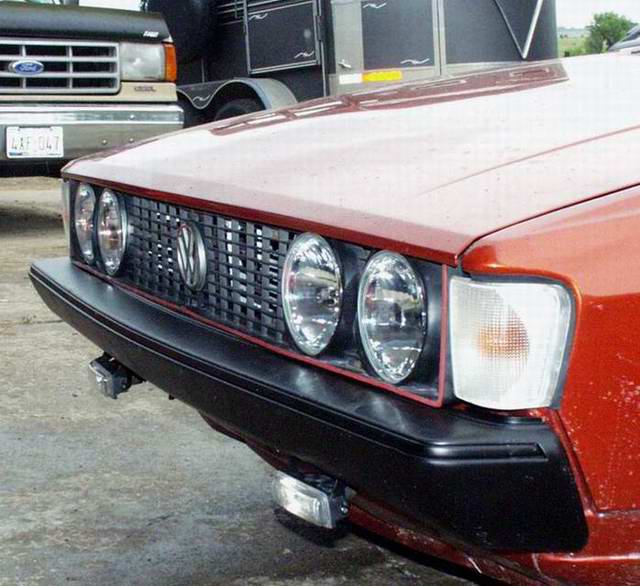
I know, you have seen a dozen web sites with this modification on the web for the MK1 and MK2 well perhaps you want to look closer.
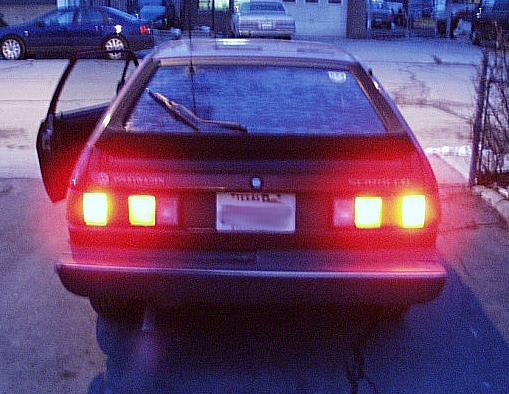
I will admit once again I took a readily available idea on the web, but I changed it around. Every single one I have seen so far (and I have counted over 18 sites with this modification listed), and I noticed ONE common factor, everyone is copying, every one else, and put their brake lights together, some how, like an unspoken standard, became apparent to my eyes…
Though the listed modification helped me a great deal in figuring it all out, I could not bring myself to make the same boring change as everyone else. So? what did I do that is so different?
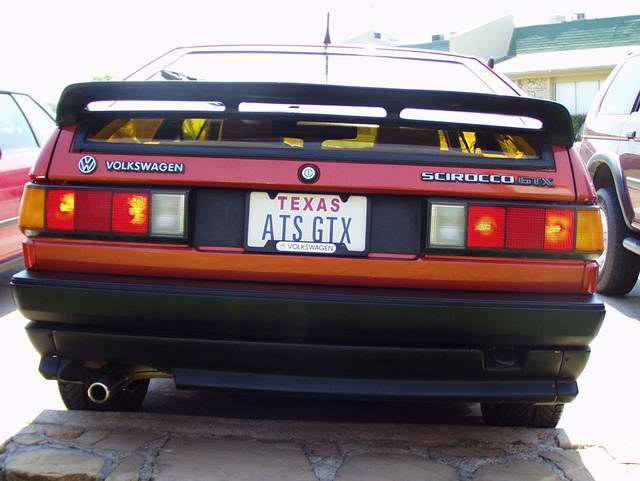
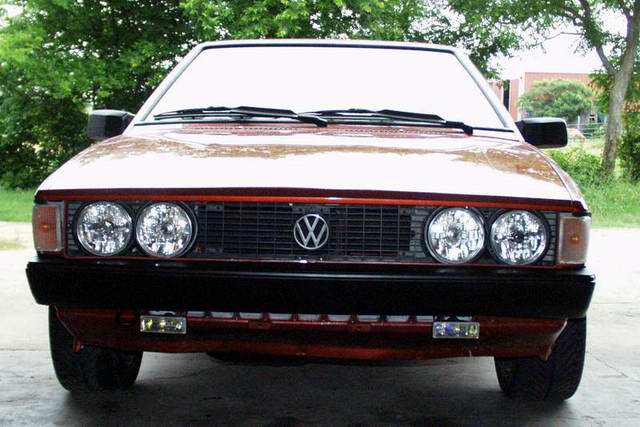
Round Headlights on a Scirocco, is like returning what was taken away with them 4×6 headlights. Annoyed at the cost of euro lights and its wide distribution, I decided to move back into time and change the missing link on my Scirocco. to give it back its purebred look that VW took away in 82.
Parts needed for this project:
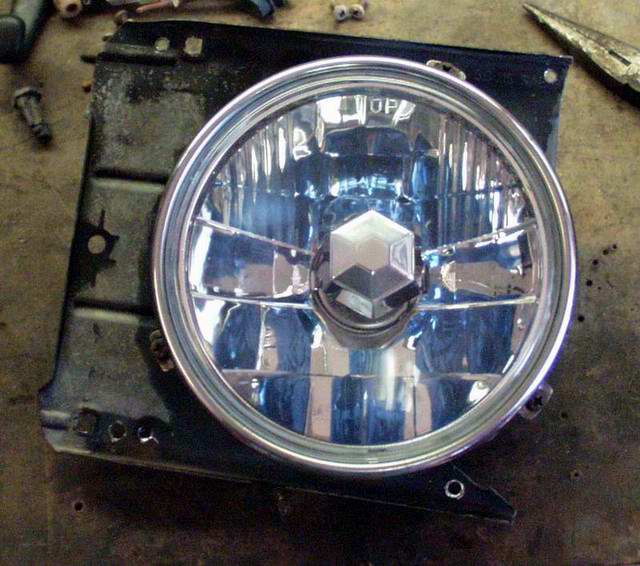
2 complete PAIRS (4 assemblies) of Scirocco Mk1 headlights frames,
1 complete pair (2 Assemblies) of Mk2headlight (USA OEM),
1 GTI or Mk1 Scirocco Grill (or make your own).
cut each Mk1 headlight assemblies in two parts, keep the low beam (outside beam lowest profile) parts.
Now remember this is a custom install there is no perfect way unless yours a welder :), so you need to make the Mk1 parts (2 per side) so that when you hold the grill up against it, the headlights are spaced properly and centered the VW insignia in the middle of the grill parts. (this is the annoying time wasted moving the left and right side by hand (suggestion hold grill against radiator frame, line up one headlight drilled holes, screw it in, place opposite side in as well the other should fall in place.
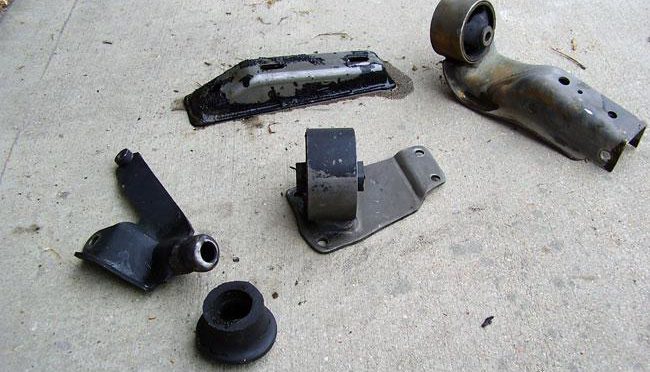
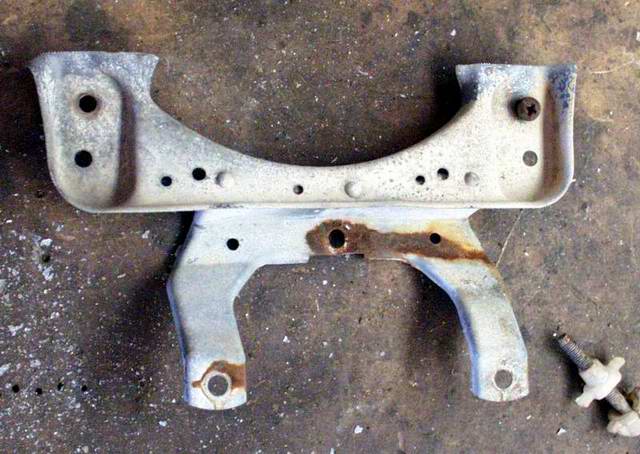
Now cut the MK2 brackets has shown.
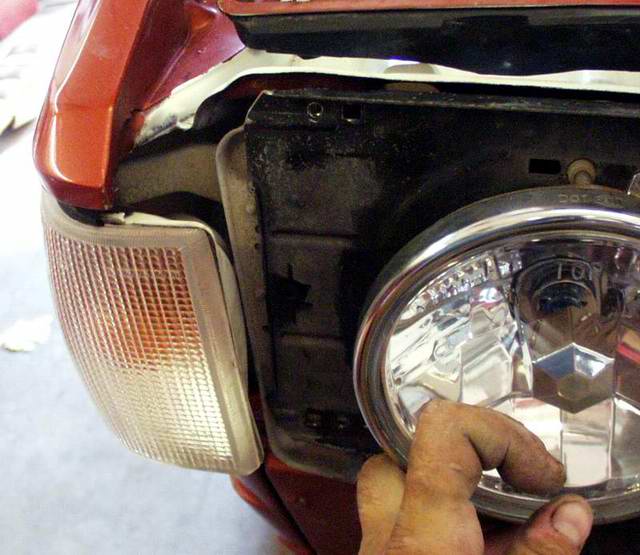
mount your corner lights back on it and install on the corners of the car 🙂 if you left enough metal on ends it will fit perfectly aligned (maybe a little trimming involved) with your Mk1 brackets, I slid mine underneath and use screws to hold it in place (upper and lower corner screws of the Mk1 corner headlight).
This picture is to save yourself a lot of time if you encounter this situation… it doesn’t fit properly, don’t hack at it, grab the other corner light, your tying to use the wrong corner in.
the grill has 2 holes (a top and below) in between headlight, use a long screw with a sleeve to prevent screw to pull it in too far. and 4 in the split part of it (only the top ones touch metal.)
there your done, select you headlight as you wish, and go drive your car around.. and don’t forget to post on VWVortex your job, so the rest of the folks can gawk at it.
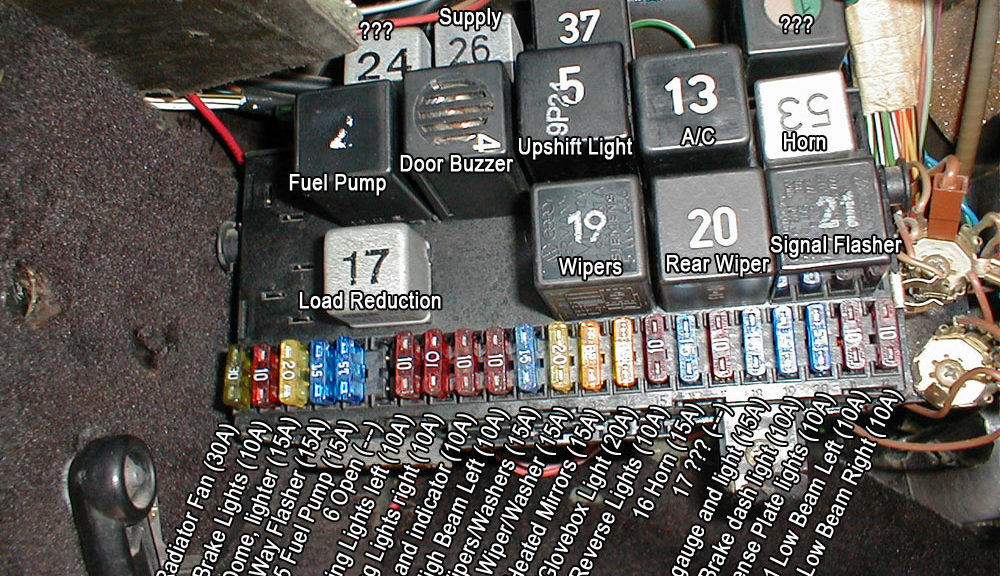
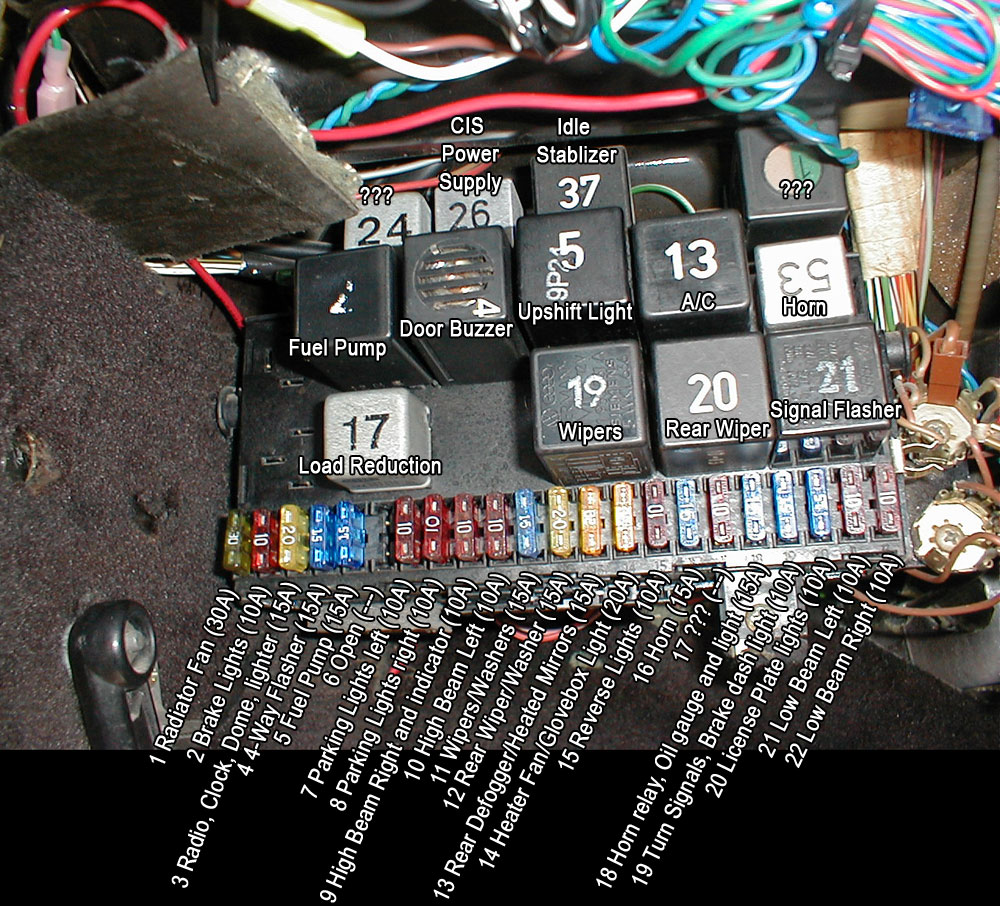
Here is a color picture of my Fuse panel – In my 1984 Scirocco with A/C and Power windows. List Should be the similar for any German made car after 83 until 93 (CE1 and CE2)
Fuse Box
Fuse #
Rating
Description
1
30A
Radiator cooling fan
2
10A
Brake lights, cruise control
3
15A
Cigarette lighter, radio, clock, interior lights, central locking, instrument cluster
4
15A
Emergency flashers
5
15A
Fuel pump; Oxygen sensor heater (1990-1993)
6
Open
7
10A
Taillights, parking lights, side marker lights – left
This is from rocco_luvron vwvortex about a 1978 Scirocco’s Fuses
1) L headlight, low, 8A 2) R headlight, low, 8A 3) L headlight, high/high beam warning light, 8A 4) R headlight, high, 8A 5) rear window, 16A 6) break lights/emergency flasher, 8A 7) interior light/”cigar” lighter/clock, 8A 8) turn signals/turn signal indicator light, 8A 9) back-up lights/horn, 8A 10) heater fan, 16A 11) windshield wiper and washer/rear windshield washer only, 8A 12) license plate lights, 8A 13) R parking lights/R taillight/R side marker, 8A 14) L parking lights/L taillight/L side marker, 8A 15) Radiator fan, 25A 30) inline fuse under dash, rear window wiper, 8A 40) radio, 5A
Relays From the Bentley manual: (For German-made cars 83-93) Relay panel diagram:
19
20
21
22
23
24
Top (Accessories)
13
14
15
16
17
18
1
2
3
4
5
6
Bottom Section
7
8
9
10
11
12
Fuse Panel
Location
Description
1
Digifant control unit 1990-1993
2
Fuel pump relay
3
Seat belt Warning Buzzer
4
Upshift LED control unit
5
Air conditioner (If installed)
6
Horn Relay
7
–
8
Load Reduction (X relay)
9
–
10
Intermittent wiper relay
11
–
12
Turn signal flasher, hazard lights
13
–
14
Hot-start pulse relay (1983-July 1987); Cold-start enrichment (July 1987-1989); Radiator fan after-run control unit (1990-1993)
15
CIS Power supply (1983-1989); Starter interlock (1990-1993 automatic)
16
Idle speed boost/stabilizer control unit (1983-1989 CIS), Hot-start pulse relay (CIS-E), open (1990-1993)
17
Fuses – A/C thermofuse (30A), Power convertible top circuit breaker (20A) – Cabriolet only
18
Coolant low-level warning control unit; Idle boost control unit (CIS-E)
19
Power window fuse (20A) and Power window Relay
20
–
21
–
22
–
23
–
24
–
ATS Technotes + Timbo's Technotes. An archive of tech procedures for fixing early watercooled VWs from 1975-1992 with a focus on the VW Scirocco Mk1 and Mk2.